Stitching News July 2020/2

Welcome to another July Newsletter. I have to say that the weeks pass so very quickly, and sometimes I feel that I have achieved very little, and at other times I look back and am surprised at what I have done! Life is still very upside down and I find it quite difficult at times to get myself organised! Today was a good start with two lovely loaves of bread baked. The dough was put together yesterday and had fermented for 18 hours! Wonderful flavour and texture!

In this Stitching news:

  1. I shall show you my finished stitched cover for the concertina book in which I mounted Unit two‘s samples
  2. I am prepared now with my some sewing/ quilting to keep my fingers busy in the evenings
  3. More progress with Unit 3, and a decision about presentation of this work!!
  4. Finally a lovely trip down memory lane, for those of you who remember life in the 1950s!

The finished bookcover measures 17.5″ by 10″.

I started with a layer of Brusho painted coffee filter paper which is brilliant orange and blended yellow. Behind that that is a hand dyed green fabric, which is the lining.

On the top of the orange filter paper I stitched a panel of Brusho painted cotton fabric, and various sizes of blue dyed fabric squares and oblongs from shirting fabrics. They were all stitched securely before adding a variety of strips of the orange filter paper, dyed fabrics, and ribbons, attached with automatic stitched patterns. Embellishments of couched threads etc have also added more interest to the surface. The edges are finished with a 1/8″ binding of the shirting fabric.

I bought the beautiful sheer ribbon in Venice about 14 years ago as a “knitting yarn”. When I saw it I knew it would be wonderful as an embellishment, and indeed it has been used many times in different guises. Here I doubled it and secured it at the back of the book cover, so that it doesn’t part company with it. It makes a very simple, but rather beautiful closure for the wraparound cover.

This cover has doubled up as one of eight “extended stitched samples” which are required to have been worked by the end of the 6 units in this Machine Embroidery Course. The book cover is an example of stitching with the feed dog up, producing line and texture.

In this Unit (3) we have to prepare four of the eight “extended samples” The second, of my four samples is shown below:

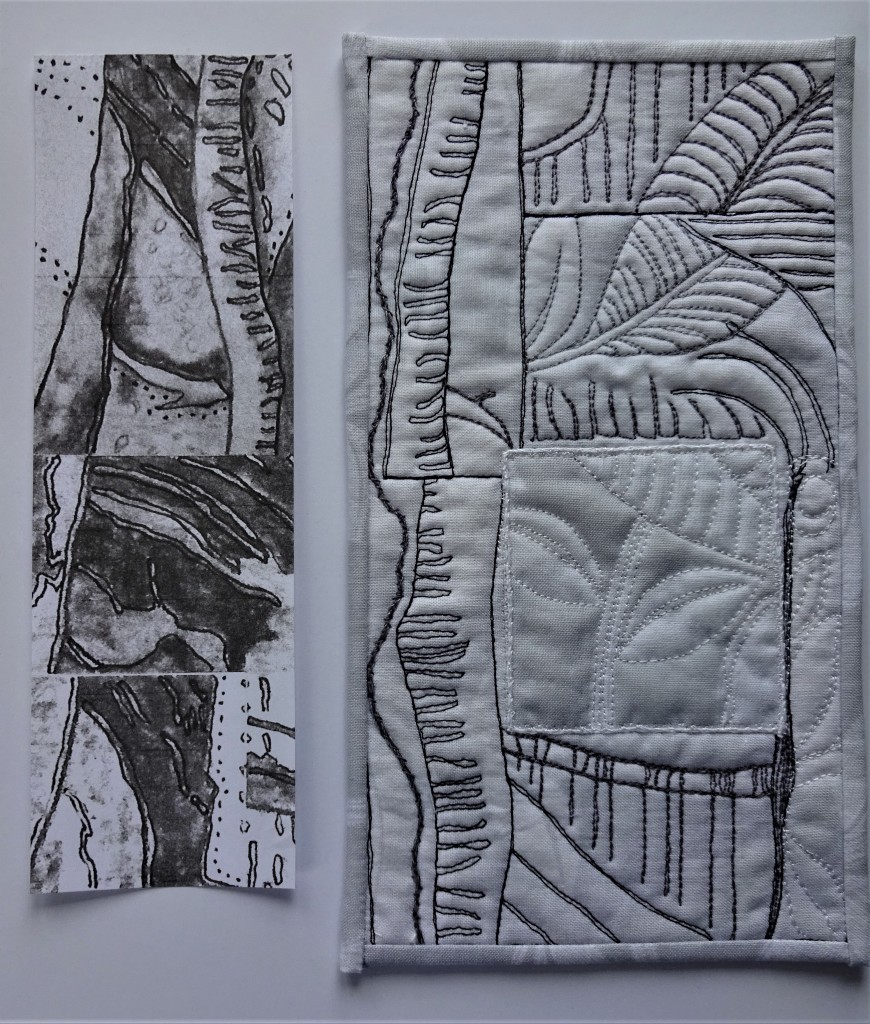
On the left of this photo is a partial photocopy of some collages I made of different scales of my drawing of the tree trunk: shown in the last Stitching News.

I used the photocopy as inspiration for this extended stitched sample.

This one is an example of free machine stitching producing line and texture. We have to produce two samples of this technique.

As I write this , ready to post shortly, I have completed 3 of the 4 needed from Unit 3!

Further samples I have worked on during this Unit are; bonded applique, layered and cutting back applique, and finally, whip stitch.

It is surprising how long all the samples take to stitch, because at the same time I am making decisions about the design; the suitability of my chosen ideas for the technique; and overall incorporating a range of fabrics. Colour is another very important factor within all the work. We are also utilising skills practised from all the units, and calling on the design work from previous work, or our own developments for the stitched samples.

Whip stitch is another totally new experience for me. Another time for adjusting tensions! I have found the Aurifil link I gave you in June Stitching News invaluable for reminding me about how to correct top and bottom stitch tensions on my machine. I have printed it off, as the information tends not to stick in my head these days, and I constantly need to refer back to reminders! I have posted the link again below, for those who may have missed it or (like me) knew they had read the information, but weren’t sure where! I shall be learning about the whip stitch today, as I practise!

https://mailchi.mp/aurifil/troubleshooting

So with the dyeing of fabrics, and the developing of ideas for the first assessment, there has been a lot to consider. Not to mention thinking about how to “present the work” That has not been far from the forefront of my mind. My decision is now made, and it is going to be in a simple Carrier Bag! which I shall, of course make! I have painted the paper, now! It is really necessary to complete all the work before making the presentation book/ bag/ folder etc etc. By then, you know the largest piece of work, and can therefore make sure that the size will comfortably accommodate the contents!

Initially I had decided to mount all my work in a range of books, but as I am still constructing Book 1, I have decided to change my mind from making 6 books, to making 3 books and 3 carrier bags, and ideally to have completed each presentation at the conclusion of each Unit.

My evening sewing projects have now been settled on! I actually do not want to sell my Turvy I, II, and III, original panels, which has been a disappointment to one or two people. So I am reproducing sections of each, in the same scale as the originals, and in the same overall colour schemes too.

This one on the left, is one such section of the original. They will be mounted and I shall sell these sections, when we finally manage to have our Textile Plus exhibition, “Thread of an idea” which has now been rescheduled for November 8th-12th, 2021. The little stitched panels measure 3″ by 5″ and are machine pieced and hand quilted.

A taster of all the exhibitions that have been rescheduled, is going to be on show at The Poly, 24 Church Street, Falmouth, TR11 3EG from Thursday 30th July to Friday 4th September 2020.

Jane who runs and organises The Poly has very kindly offered to show a selection of up to 7 pieces of work from each group and from the solo exhibitions, which were to have exhibited, but have asked to reschedule.

The exhibition will be in the Spring Gallery, on the dates above, and is called ‘Rescheduled’. She is curating it, making all the labelling and promoting the new dates for each of the exhibitions. It is a tremendous gesture on her part to launch the fresh opening of the Gallery. All galleries are struggling at this time, so if you are able to visit any craft exhibitions near you, it would be marvellous to support them. This exhibition will be physical and open to the public in line with their social distancing policies for reopening.

Finally today I just wanted to share a poem that my brother in law, sent my husband this week. It is absolutely nothing to do with sewing, but an old school friend of his had sent it to him, thinking he would really enjoy it. It really resonated with me, and I am sure it will with some of you too!

Back in the days of tanners and bobs, when Mothers had patience and Fathers had jobs. When football team families wore hand me down shoes, And T.V had only two channels to choose.

Back in the days of three penny bits, when schools employed nurses to search for your nits. When snowballs were harmless; ice slides were permitted and all of your jumpers were warm and hand knitted.

Back in the days of hot ginger beers, when children remained so for more than six years. When children respected what older folks said, and pot was a thing you kept under your bed.

Back in the days of Listen with Mother, when neighbours were friendly and talked to each other. When cars were so rare you could play in the street. When Doctors made house calls and Police walked the beat.

Back in the days of Milligan’s Goons, when butter was butter and songs all had tunes. It was dumplings for dinner and trifle for tea, and your annual break was a day by the sea.

Back in the days of Dixon’s Dock Green, Crackerjack pens and Lyons ice cream. When children could freely wear National Health glasses, and teachers all stood at the FRONT of their classes.

Back in the days of rocking and reeling, when mobiles were things that you hung from the ceiling. When woodwork and pottery got taught in schools, and everyone dreamed of a win on the pools.

Back in the days when I was a lad, I can’t help but smile for the fun that I had. Hopscotch and roller skates; snowballs to lob. Back in the days of tanners and bobs.”

Credit: Pat Fairless

I hope that has brought a smile to some of your faces! It certainly did to mine …. Until next time,

Happy Stitching

Di

Stitching News July 2020/1

Welcome once again to this July post of Stitching News. Several new readers have joined us again in the last couple of weeks. I sincerely hope that you enjoy this first post of July. The summer is upon us, and Cornwall is getting busier, even before July 4th, when the extra relaxation of the rules since lock down begin. I must say we are staying put, and being very cautious about wandering amongst the visitors, although we would love to see our grandchildren and family.

In this post I am writing about:

  1. Make do and mend!
  2. Further progress in Unit 3 of the machine embroidery course which I started in March. So much to learn and practise, but my enjoyment continues.
  3. Progress on Turvy III

I have been meaning to buy a new ironing board cover for months!! Then there was lock-down and the cover had deteriorated to a point that was driving me to despair! So a couple of weeks ago I decided to mend it! I hasten to add that the deterioration is nothing to do with household ironing, but due to additional wear and tar from the constant small fiddly bits of ironing when I am stitching and pressing seams etc. I do this a zillion more times that I iron clothes!!

I had a large torn area near to the iron stand. For many years that has been the area that has always been vulnerable on my ironing boards. The badly worn patch with a large hole in it had been exposing the inner foam sheet for far too long! It always happens where the heel of the iron sits! Why have I never thought of mending ironing board covers in the past? It was a doddle!

I cut two large pieces of white cotton; one for underneath, and the other for the top. On the under fabric I had ironed a piece of Bondaweb the same size. It was placed with the Bondaweb uppermost. The top layer of white fabric, was placed over it, and the burnt very damaged area was sandwiched in between. I could see to match the placement! No hems, as I wanted it to lie as flat and smooth as possible. I then added a smaller patch for good measure. This is the blue one in the photo, which still well and truly covered the damaged area. Everything was stitched in place with a zig-zag stitch. I hasten to add that the area I have covered, is far larger than the damage! It just seemed sensible, while I had the cover off, to reinforce a larger area. This cover should last for a good while now, before being patched again, maybe several times! Boro comes to mind! However, these are “make do and mend times”… and strangely it has given me a great deal of satisfaction!

Unit 3 has been in my possession for a couple of weeks now, and I went straight to the end of it, when it arrived, and started on my planning etc for the first assignment, as you know from the last post! So I have now returned to the beginning with Exercise 1; a drawing exercise in the design element of the Unit.

This is about form and texture. We had to choose a “natural object” such as a shell, branch of wood, stone etc.” to draw, endeavouring within the drawing to create the 3-D nature of it, as well as the textures.

Then we had to isolate one area and reproduce this as a collage using a variety of papers and card to create the textures as well as possible. We had to disregard colour, and concentrate on the form and texture. I took the photo of this fabulous tree trunk, hosting a well established climber of another species, when I was abroad on holiday a couple of years ago.

It seemed a very good example to work with as you can see. Not a great deal of variety, but sufficient to think about!

Have I bitten off more than I can chew?

I must say that this was a huge challenge for me. I was well out of my comfort zone, but commonsense tells me that I need to challenge myself in order to progress. I lost my way a little as I was nearing the bottom, but I was pleased with the majority of the drawing, especially as I had not attempted anything quite like this before! I have always been a fan of the saying: “If you want to grow, push your limits” as my ex students can probably well recall!

I used an HB propelling pencil, and a 2B pencil for the drawing. Next I isolated an area and thought seriously about how I was going to produce the collage.

The brief in the Unit actually says “You are now going to interpret this in depth, using a wide range of papers to create a texture sample”.”Scrunch, pleat, fold, do anything which will create variety and raised areas”.

Anne has also given lots of ideas of what sort of papers we might use….indeed I have been using a wide range of different papers in both of the previous Units, so have become increasingly aware of their various qualities.

Observing my subject matter closely was the main “tool” required to do this exercise We were referred back to various parts of Units 1 and 2, during these exercises….building on skills already practised in the course so far.

It took me a long time to get going with The textured collage, and it certainly wasn’t my finest hour, but I gave it a shot! The background texture of the main tree trunk has worked well, and I think the whole collage relates back to the original photo!!

I have used screwed up brown paper, white card, smooth thick brown paper, torn off corrugated carboard, which I also used. I also used some recycled florists paper, and some Indian rag paper. I must admit that I have used some string as well.

PVA glue was used for attaching it all to an A4 piece of card.

Dyeing fabric was my next task in this Unit. This is one of my all time favourite activities, as those of you who know me, will be well aware of! As was going to use this opportunity to dye a specific range of colours, I actually didn’t use the method that Anne had suggested in the Unit. She gives lots of information on the process, but I needed some dyed fabric for a specific piece of work, so I chose a method I have used many times in the past.

I am actually very low on hand dyed fabric at the moment, so this has come at a very good time for me. I have used Procion and Dylon dyes for years. The latter are easily bought on the High Street and I do like the more muted colours I have to say. I do have quite a selection of Procion dyes too, but for this particular dyeing exercise I have used Jeans Blue Dylon dye, and I made up my orange colour with a Procion scarlet dye mixed with a little Procion golden yellow. Blue and orange are complementary colours and will give a lovely range of earthy colours. Any mix of complementary colours will do this. If I had chosen to do an exchange between two primary colours, the result would have produced bright, clear colours.

I haven’t dyed any fabric for at least two years, and as I am constantly dipping into my stash, it has become well and truly depleted. I prepared a household soda solution, and having machine washed all the fabrics that I wished to dye, in the washing machine to remove any factory dressing in them I took them from the washing machine and put them into the soda solution, soaing them thoroughly. The soda fixes the dye to the fabric. I have a set of measuring spoons, Marigold gloves, an old apron, a plastic jugs, recycled containers and disposable masks set aside (the latter for use when I am using dye powders) and purely dedicated for use when I am dyeing fabrics.

Below is the full selection of the fabrics that I dyed. As you can see I also soace dyed a few threads. Can never throw up an opportunity!

The exchange method of dyeing required me to put my measure of liquid dye into a poly bag, supported in my “dyeing” jug. Then I dropped a piece of soda-soaked fabric into the bag and I squeezed and manipulated the colour into the fabric, through the plastic bag. I pushed the coloured fabric firmly down to the bottom of the bag, twisted the neck of the bag just above the tight wet ball of fabric, so that no liquid could leak out, and I sat the bulk of the bag on its “tail” in an old washing up bowl. I worked through the order of adding dyes to each new bag (there are 9 steps in total, and therefore 9 polythene bags). Confining the wet dyed fabric in a small space helps to give textured pieces of dyed fabric. If you want flat dyed fabric, the fabric needs space within the bag, but even then you will probably have some marks. These are what makes the fabric so unique.

It is important to have a range of pale, mid tone and darker tones in a piece of work as this gives it its energy, and sometimes a little clash of colour works wonders too! You can see here that I have dyed some commercial fine stripe shirtings and checks. Because I often work in miniature, I love the scale of the woven stripes and checks. They work really well in tiny pieces!

So, when I had reached the 9th bag I went back to the first bag and added another piece of fabric to each bag, manipulating and squeezing the bags again, ensuring absorption of what dye was let in the bag into the fresh piece of fabric added. and I frequently added yet another fabric to the bags too.

I have found over the years, that doing this is the easiest way of producing a range of tones that all work so well together. The later addition of fabric, has given the first piece an opportunity to soak up as much of the dye as it can, resulting in a good strong colour. Subsequent additions get paler as they are added. Even if a fabric looks as though it has not changed at all, if you put it up against the original white, you will see a definite pale colour there. It is almost impossible to by really pale fabrics, so this method works fantastically well

Another bonus is that every bit of the dye solution is utilised in the bags. you don’t end up pouring unspent dye down the drain! I leave them soaking for at least 12 hours, before rinsing them until the water is clear. I always include a very hot rinse, followed by a cold one again, during this process. Then I give them a final hand wash with just a little Stergene in the water. I spin them in the washing machine to get rid of the excess water, then I iron them dry!! This is the exciting part when you can see all the subtle variations of colour and shading within each individual piece. They are always darker when they are wet, and while ironing them their true colours and the wonderful marks, and shading appear.

I hadn’t really achieved the “terracotta” range I was looking for after rinsing drying and ironing the initial dye run. Some of the fabrics were very brown, so I removed some of them, as well as the really vivid orange results. I soaked them thoroughly again in the soda solution, and over-dyed them with Procion magenta. This time I was delighted with the finished results. At the top of this photo, you may notice that I have also included some of the “unexpected grey/green results from the first batch of dyeing.

Some of these fabrics will now be used in the rest of Turvy III. I have given an explanantion of my choice of colours for this panel, which clearly illustrates my particula choice of colour for this session of dyeing!

I have given a great deal of thought to Turvy III, since my last Stitching News. Getting it out and reveiwing it a coupe of weeks ago, whetted my appetite for working on it again! I was also inspired by two friends, who are very talented textile artists to begin working on it sooner than later.

They don’t know each other, but during the last couple of weeks they had both independently told me that they had some hand sewing of hexagons on the go.

That really resonated with me and I thought that I might stitch Turvy III over papers. I am very fond of English piecing over paper templates. It is a great project to have as it is portable and easy to work with in the evenings. So I traced the top two rows onto freezer paper, ready to cut them up into templates, and I prepared and pieced the first couple of rows over a few evenings. My original design is here on the left.

I like to use freezer paper for my templates when working with small pieces, and fine fabric. The combination works well for me.

Here are the first two rows of paper piecing laid onto my master copy of the design. However, when I looked at them I could see that they were coming up a little larger. I understand that; it is due to the nature of folding the fabric over a template. But my main concern was that the technique was also looking very different to the other two panels, so after some consideration I decided to go back to machine piecing. The panels are in “series”…and as such I feel they should not look so different due to the technique!

Here is the fresh start of the piece now that I am machine piecing of the top three rows. I have completed three rows. you can see that I have drawn the straight grain of the fabric onto each template with a red crayon.

The row of templates will stay in place until the next row been sewn to this row. Only after the two are stitched together, will I take off the templates from the above row. The measurement of this piece, so far, is 8.5″ wide by 3.25″ in depth, (inclusive of seam allowances). I am much happier with the appearance now! I already have another plan for hand sewing in the evenings!

So, in both of the last two items I have discussed; the dyeing, and the piecing, it is evident that my initial efforts in both weren’t giving me what I was looking for. All the experimentation was invaluable, and I could make the changes I wanted with little fuss. The moral in all of this is not to “make do” with how things are going, if you feel uncomfortable, or disappointed with what is happening. Just have another go, and see if you can make it more to your satisfaction. Nothing is ever lost. Every part of the process is a learning curve for all of us; experienced sewers as well as beginners!

My colour palette for Turvy III is a muted palette of colours with a range of dark, medium and light tones, using the complementary colours of blue and orange. All the house roofs will be within the dark terracotta tones, with the body of the houses depicted within the warm medium and light tones. For the “background” I am using a range of soft blues, taupe and grey fabrics. Hence my colour choices for the dyeing exercise! I have an excellent range now for this and further work to compliment it.

So, onward and upward. I have plenty of Unit 3 work ahead of me. I wish you all well, with any projects that you are working on.

Until next time … Happy Stitching

Di