MAY 2024/ 1

I am sorry that I did not manage a post during April.  Time has run away from me, but Bank Holiday rain, and a need to be in touch after such a while are my motivations today.

Last week when I walked up to Heligan to meet friends for coffee, the hedgerows were so verdant and whilst some flowers were almost over, the bluebells and red campion flowers were magical set in amongst all the green hues. I came across a healthy patch of violets, a few primroses were in flower, although most were over.

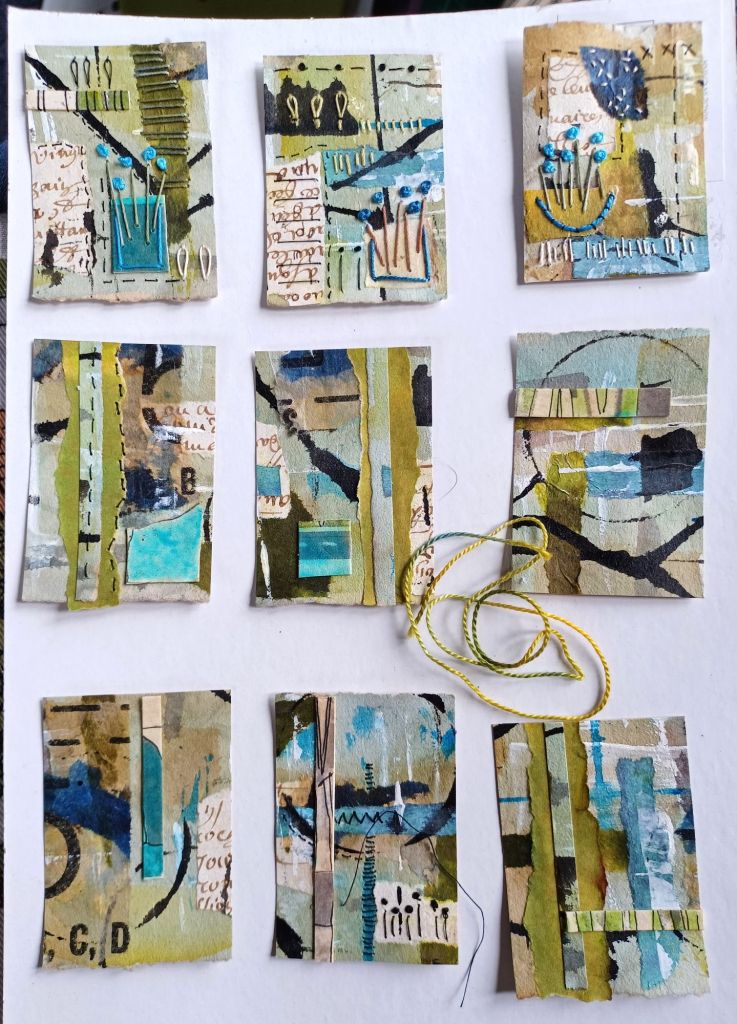
I am starting to work on some small stitched and abstract, collaged mixed media panels. I am slowly gathering and sketching ideas. I have made one of my “single-page, folded and cut” sketch books to record ideas that flit around my mind. I want the panels to have a feel of the little miniature collages I have been making. The miniatures are entirely hand stitched, but these will have a mixture of hand and machine stitch. They will all be made from scraps, and fragments; the title of our next Textile + exhibition in November 2025.

During April I had a massive tidy up in my studio. I had almost given up going in there as it was so untidy! I got up really early each morning for a week, and set too. What a difference! It is such a pleasure to work in there now. With the table moved temporarily downstairs  it was much more spacious and it made the whole task seem much more manageable.

 if you enlarge  the photo above, and focus on the purple fabric container, you will see a miniature Suffolk-puff clown. A friend gave him to me decades ago, and if she is reading this, do know he is still well loved. He is beautifully made and assembled, and measures just 3″ high.

The pot inside, with its lid tilted, contains my hem clips which are used very regularly and are a firm favourite amongst my tools.

Another small area that was not easily accessible before.  My 8- sided table has just been a “dumping ground” where it was situated before, but now I am just putting “work in progress” on there. Each in it’s own basket with the fabrics, and threads, plus any other notions needed, for each project etc.

Clean and tidy sink area! When we flooded so badly in the Tewkesbury floods of July 2007, we had to have a temporary kitchen put in upstairs. We stored the sink unit and cupboard along side it, after the renovations had been completed, as I had hoped it would come in useful after we moved. (Our house was on the market before we flooded). It has been amazingly useful, as I am sure you can understand.

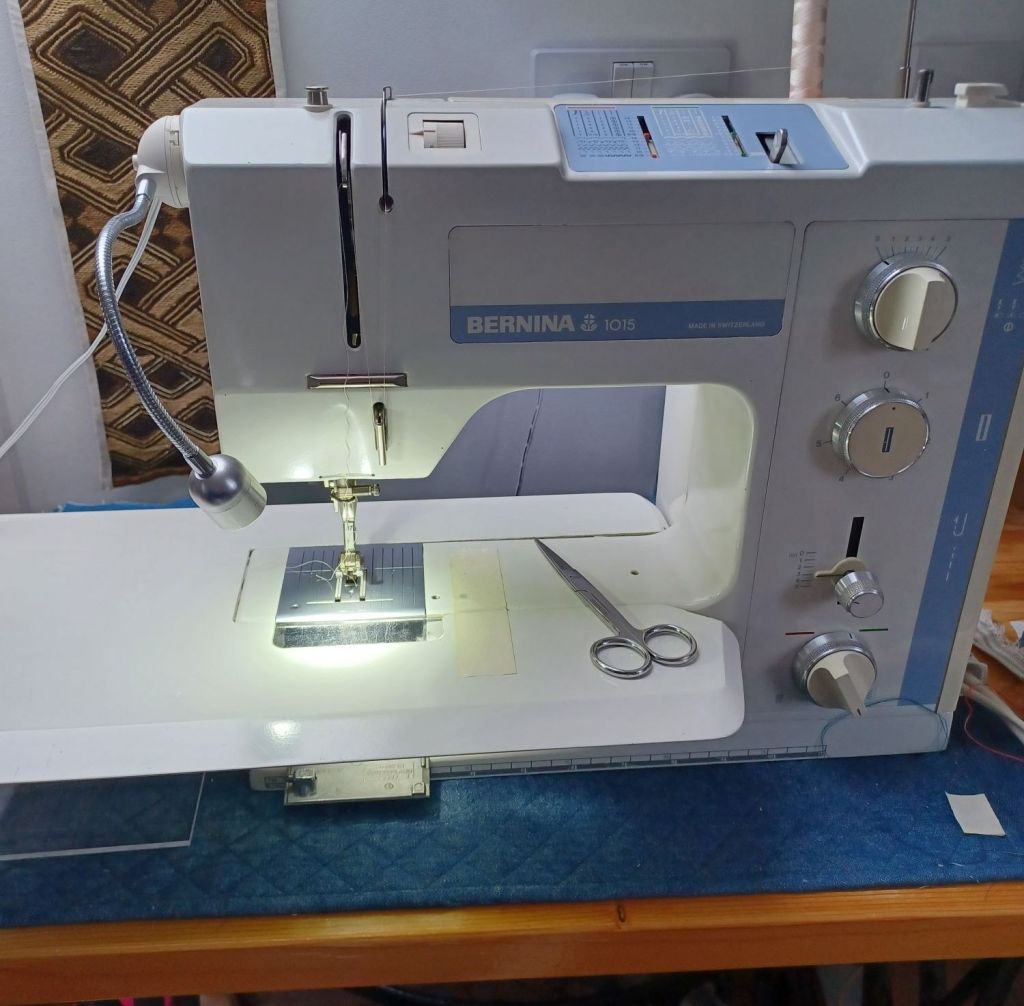
I am SO enjoying using my machine again. It is still behaving itself. Any hint of a problem, I clean it thoroughly, change the needle, and it purrs again! I have been recycling one of Robs shirts, in making a bag.

It may not be immediately clear in the photo below, but the colour of the shirt is teal green, and the strip on the left is the button hole plackett, with a line of additional hand stitching to the right of the button holes. I have used a variety of fragments, interspersing them with scraps from my vast collection!

The pocket you can see near the bottom of the bag, was very carefully removed from the shirt by snipping the two rows of stitching which had been stitched down the two side edges, and along the base of the pocket. When it was separated from the shirt it was easy to add embellishment with the deep fuschia coloured hand stitching, and a patch from some snippets of the linen fabric, before machine stitching it back onto a new backing, through the original machine made holes.

The self covered fuchsia pink button,  (the first I have ever attempted to cover) will be part of the closure. The right hand corner of the bag, is going to fold forward, at an angle,  creating an asymmetric triangle, where a loop will be attached and will wrap around the button. Inside the bag above the button there will be a magnetic closure too, so that the top is totally secure. The shoulder strap will be attached to the sides, and will be made from the “ticking” fabric, with inserts of the fuchsia coloured fabrics.

This is the other side of the bag; button plackett at the bottom, a “pocket” sized patch made from the original patch of fabric, revealed when I had removed the original pocket!

The whole of the lining and top binding has been cut from the rest of the shirt, and the buttons are the originals still in their original positions.  Rob and I are very late converts to Wordle, and I have called this bag, my “shirtle bag”,  which he thinks this is a subconscious nod to the title of the game! Who knows! I had never connected the two, at all, but now, of course the connection will not go away!

During May we shall be away for a while, so I am keen to prepare at least one of the small panels, (two would be stretching it somewhat…)  but it would be great to be able to complete the hand sewing, on at least one of them during that time.

Until next time, happy stitching!

Di

MARCH 2024 /1

Good day and welcome to this edition of Stitching News.

Life has been really busy since I last wrote, but I have managed to prepare some more tiny collaged pieces ready for stitching.

I have painted some more papers as well as raiding my scrap bag of painted papers, to gather a group which work well together. I have stitched into each one creating line, contrast, repeat pattern and change of scale.  It is fascinating to see each one develop. I have no preformed idea about how to add stitch, ideas start  as soon as I have added my first stitches!

As I so often state, “it is the” doing” that creates the ideas. If I waited for inspiration to strike, not a lot would happen at all, but as soon as I make a line of stitches, it alters the whole dynamic of the surface and another suggestion comes to mind!

I review each small collage constantly, aiming to create an interesting surface, which has a focus  and is balanced.

These collaged pieces are 2″ x 1.5″.  The size doesn’t mean they are quick to make. They are all stab stitched as there are often several      layers of paper to stitch through, and being papers of varying thicknesses they can also be really tough to push a needle through.

There is no way I can gather stitches onto my needle as one does when stitching into fabric. Stitching into papers means punching a few holes at a time with my needle, according to what stitch I am creating, so that I can see from the back of the work exactly where to bring my needle back up to the front.

My painted collage papers are mostly created from recycled papers, brown, white, and grey packaging papers. I also use the backs of old work sheets,  and some papers from discarded eco prints, which did not print clearly. I have lots of these discarded papers and they are perfect for recycling in this way, often giving surprising and fascinating results. For instance, a couple of weeks ago I used a weak leaf green watercolour washed over a very pale eco printed fern, and it lifted the print into a beautiful, soft golden result! Whether it was a result of the watercolour paint reacting with the iron water used in the printing process I have no idea. But it was a real serendipity moment!

I shall be displaying my cards (which will be on sale at our next Textiles Plus exhibition in 2025), in cellophane bags. So, instead of buying some, as I do not have any to accommodate 3″ cards and envelopes, I decided to stitch some larger ones to size, then trim the excess, leaving a small seam allowance.   I had wondered if cellophane may have a plastic derivative, but from reading various articles on the Internet, it is clear that it is a cellulose, ( as its name suggests and it also seems that it is biodegradable and apparently its particles have little influence on the environment.

Cellulose is the structural component of plants; wood, cotton  hemp and maize are a few examples of the natural materials that may be used to make cellulose film.

I apologise if this photo is a little out of focus, I cannot seem to sharpen it, but you get the idea!

Last, but very definitely not least, below is a photo of my trusted, long used, 1015 Bernina which I bought in 1987, but had put away put away during Covid because it was breaking the thread every few stitches. I could not work out why. I had regularly had it serviced and it had never “played up like that” before.

It went off to be investigated, and came back mended, but before long it started all over again! The other day I visited a lovely friend called Sue, and she told me she had watched a Bernina video about cleaning the machines She said that many problems can actually be fixed by using a cotton wool bud to clean the machine. I had always used the brush that came with my machine, never a cotton wool bud.

So, I got my 1015 out again, and cleaned it thoroughly with the said item. I was astonished at how much dirty fluff etc. came away. I have always cleaned my machine regularly, but clearly the brush did not do it satisfactorily. 

As always, I took the race out and the foot plate off  and accessed every nook and cranny possible. 7 cotton wool buds later I was no longer getting any more dirt!

I threaded it up and tried it out and it purred to me. The sound was wonderful; it just purred, and there was not a broken thread in sight. I put my very old red-suitcase Bernina away again. It was a good little substitute but I was always conscious that the straight stitch never seemed totally straight, which was a problem to me when top stitching! The machine’s pedal was not so smooth so when when I was free machine quilting I did not get a smooth stitch. But I am now back in happy land again. Over the last three years I had been mainly hand stitching, but I plan on machine piecing a lot this next year. Incidentally, you can see a piece of masking tape on the machine table to the right of the foot plate. This was my guide when stitching the cellophane bags.

Until, next time, Happy Stitching…!

Di

February 2024 /1

Hello to all my readers. I hope you are coping with this horrendous wet weather that has been plaguing many areas of the UK for months, and particularly badly for the last three months.

Our garden is soggy and totally saturated, as are most people’s.  However the polyanthus and primroses are always happy, as they seem to like our soil in any condition! The snowdrops have been and gone now but the sweet tete a tete miniature daffs are wonderful; seemingly flashes of sunshine, scattered around the front of our garden.

This month I have had very little time for stitching, as life took over, leaving little room for anything else. last week, was the first time I was working in my sewing room, for weeks and feeling ready to get started again.

I decided to create some small collages for cards, and started working on some ideas. When I say small, I mean tiny, really! The collages are built up on a base of approx 2″ x 1.75″. I am using colour schemes to bring a zing to them. I am thinking of them being used as special “thinking of you” cards, which could be sent on a variety of occasions, to suit a range of scenarios.

Several hours of decision making, preparation, and embellishment with stitch have been put into each one, and as they really make me smile I know it is well worth it. Above is a photograph of a selection of them; mixed media, painted papers, dyed threads, water colour painted images. I intend to have a range of different colour groups, and am just starting to assemble a couple of neutrals.

Finally I have done very little stitching on my scarf this month until the last few days. I am happy with how it is looking. The textures and colours are suiting me as is the therapeutic nature of the work, i.e. slow stitching. It is mesmerising, calming and restful. Just what I need.

2024 started with a nasty virus that really laid us low for the best part of 3 weeks. Quite a flurry of commitments have happened since, and I am  going to take life as gently as possible, when time allows. No more rushing around to get things done in a hurry, but just seeing what I am keen to move forward, and balancing that with general weekly structures and routines.

Again, this is a short Stitching News as I am still negotiating my way around the WordPress system for compiling the blog, on my tablet.  My laptop still tells me I do not have an account, which is infuriating, as it is accessible on my phone and Tablet, and I have had this account for 7 years. I have been investigating it all a little more, but am concerned that I may lose it on my tablet, as well, if I fiddle any more. I would then have to start all over again, and am not sure I have the energy to do that. I have not got the technical skills to understand the system sadly, so shall just have to do my best on my tablet until such time as I can get a more techy friend to help me.

Until next time, Happy Stitching!

Di

January 2024 /3

Welcome to you all. A week of dry and warmer weather down here in Cornwall, has been so welcome. Frogspawn has appeared in our pond; I do hope it survives, as I am sure we are not through with very cold weather quite yet! It is great to see little clumps of snowdrops appearing, as well as crocus with their gorgeous bursts of bright yellow.

I have been totally unable to access WordPress on my laptop over the last week. This is the site I use to write my blog. When I log in, it just tells me I have no account! Very unhelpful, and so frustrating! I have spent far too many hours trying to find the reason, in vain sadly, so this is a short post to give me an opportunity to try writing a post on my Samsung tablet!

I am thoroughly enjoying stitching my scarf and will show more as it progresses. Today I have made freezer paper templates for the doll, and am considering making the entire doll’s body in Patchwork. It will possibly drive me insane, so I will just have to wait and see.

The photograph above shows the individual body sections I have deconstructed. From the left is the leg, and the small oval shape is the base of the foot. Next is the arm, and the slim shape to the right of the arm is half of the back of the trunk.

The section with the 3D image at the top, which I have left intact as a guide for when I get to stitching this stage, is the front half of the head, sewn to the side template of the head. The two templates below it are the two templates involved, and the front of the body is lying at the foot of the section.

I have made a stitchline using black thread, all around each fabric piece, stitching on top of the machine holes left after deconstruction. The seam allowance was tiny and frayed very easily as I was working on the doll. I can only surmise that I trimmed the seams far too close to the machine stitchline, before I stuffed it all those years ago! The black stitch line is my guide to the finished size of each template.

I have actually made my templates out of freezer paper. I laid the fabric shapes onto my light box, placed the freezer paper on top of the selection of shapes then traced on top of the black stitched line. I added the name of the shape, drew the straight grain, and how many copies of each shape required for the doll. Then I cut out each freezer paper shape, on the drawn line. I will make card ones from these, and will then have two options available for use.

I found this little bargain in the week, A Luna Lapin book, with all the patterns for the outfits included. I bought it on spec thinking it could be a fantastic find re ideas of size for clothing my doll. It turns out that Luna and her friends are the same height as my doll. What a great off chance buy! I was quite prepared to measure, and make little patterns, but this will be a huge saving in time!

Until next time, “Happy Stitching”!

Di

January 2024 /2

Welcome to this second Stitching News of January! We are virtually three quarters of the way through this month, already, and I have just about got my energy back and have a yearning to sew and be creative again for the first time since before the New Year. On the plus side though, I have had lots of time to think and plan.

In a box with some of my dyed fabrics I found a basic scarf this week that I had played with, about 10 years ago. I remember buying some plain white Liberty Lawn fabric for dyeing, some of which I had torn into strips 8″ wide. I had machine stitched two different coloured strips together down their length. Along one of the long edges I had inserted a flat, narrow, folded silk detail, but I had left it at that.

This is about as far as my memory goes. One of the strips is blue, and the other is apricot or orange, according to which section of the strip you are looking at! They were both hand dyed with a single colour, but scrunched up to create texture along the length. At the time, I do remember that I had not liked the pair I had sewn together, which is why it probably ended up in the dyed fabric box!

Having resurrected it I decided to place some more fabrics onto both sides two or three days ago, leaving them in place so that I could add, take away, for a while. This exercise instantly changed my mind about it! It had clearly needed more colour and texture to lift it.

I experimented with several colours; prints and plains before settling on four fabrics which I thought would work on either side of the scarf.

I hot washed the scarf, and all the fabrics, then ironed them while damp. The tension along one of the long sides of the scarf was a little tight prior to washing, but while ironing, I was able to ease the tension out.

I was feeling much more in tune with the project now, and beginning to smile!

The blue patterned fabric was the real game changer. It has a range of interesting marks in its geometric patterns, with overlays and subtle changes of scale. I saw it when browsing in an African market while on holiday many years ago. As you can see from the folded back selvedge, in the second photo, it is a batik, and was expertly done on a very nice quality cotton fabric. I have a metre of it, know I will be using it again before long! I love it.

I tacked my raw edge applique pieces in position, on both sides, and have now started stitching, with hand dyed threads. I intend to stitch over the whole surface, sometimes across the width, and at other times down sections of part of the length! Both of which you can see in progress in the top photo!

Another project I have on the go now is to make a doll! I made several in the mid eighties! One of the doll bodies I made was never clothed, and I have had it stored in a drawer since then. I caught sight of it very recently and instantly felt the desire to clothe her. (I have decided that this one will be a girl.)

As you can see she is tall; 18 ” to be precise! I placed a Parker biro beside her for scale! As I examined the body and limbs I could see there was shaping, (as in the fingers and hands,) and could also see that the head consisted of four pieces. So presumed I had made her from a pattern. I looked through all my patterns but there was no doll. So I decided to deconstruct her and actually make proper templates so that I have them for any future dolls I might make! If I merely dressed her, I would lose that opportunity! Perhaps I had been loaned the pattern at the time! I just cannot remember!

I knew I wanted to be organised, and beside me I had a piece of lovely Christmas paper which could not be recycled due to  packaging tape right across it.  So instead I cut it into four strips which I could wrap around the different parts of the doll after dismantling them. I learned a lot during this process, for instance the foot had a sole, which really helps to keep the shape! I also became more aware of how to assemble the doll, which may not have been so apparent, had I not taken her apart!

As you can see from this photo I labelled the paper cuffs before placing the different deconstructed fabric shapes into them; arm and leg above, and body and head below!

I have ironed all the pieces now, and they are ready to help me prepare the templates. More about this next time!

I also have some small patchwork pieces on the go. Now that it is obviously going to be warmer in my sewing room, I shall be more tempted to spend some time up there!

Until next time, Happy Sewing! Di

January 2024/ 1

A very Happy New Year to you all. May it be peaceful and healthy. Last year my husband repotted a Eucalyptus tree into a deeper pot for me. He planted a ring of daffodils, near the base, before putting the Eucalyptus in; then a ring of polyanthus around the top of the pot. The bulbs are shooting through now and looking very healthy and the polyanthus, gathered as tiny plants, survived their transplant which was from in between old paving slabs around the garden! These are not in flower yet, they were miniscule when he put them in, but we have a myriad of them absolutely everywhere, and we have some out in flower, all year round! During late February, march they are amazingly gorgeous! The ground is absolutely waterlogged, as most people’s gardens will be. It looks so drab, in places and in desperate need of attention, but hopefully that opportunity will arise, as we roll through the month!

I am in the throes of a wicked throat infection and incessant cough. It seems to be totally unrelenting, and very unpleasant. Not a good start to the year! “Lots about!” is what I hear. I just wish I had some enthusiasm for stitching, but it just is not there at the moment! I feel drained and exhausted!

A New Year always offers fresh starts and opportunities. More often than not, we have to make the make the opportunities and be proactive! For me a completely different approach in my work has been bubbling away for many months! I have no intention of making anything complicated at all. To be interesting and catch the eye, it doesn’t have to be complicated! I intend to be quite simple, and very straightforward. The interest will come from the colour, and texture. I am thinking clothing.

But first, in order to complete my granddaughter’s scrap quilt, I made a label. I neatened the scrap of fabric first, with a turned and stitched edge, before embroidering simple flower heads around the writing. I then hemmed it invisibly to the back of the quilt.

To stop the label “ballooning” I matched the machine quilted lines on the quilt by hand stitching through to the wadding, thus echoing those lines.

I am delighted to say that she had a wonderful response to the quilt.

As I was taking down our Christmas cards I read them all again, at leisure. Thank you very much indeed for the lovely messages in them, and your enthusiasm for the continuing newsletter. It makes it so well worth writing. With a new project in mind I was also viewing the cards for those which had a colour palette that caught my eye straight away. This was nothing to do with the composition and design of the card, not to say that I didn’t appreciate that, at all. I was looking at the groups of colours that spoke to me straight away. Those go into a different saved pile, to the beautiful hand made cards, and cards with great imagery and inspirational ideas. There is such a wealth of inspiration at our finger tips from cards.

“Clothing” encompasses a myriad of possibilities. I am traditionally very conservative in what I wear! But I do like the idea of making one or two items that are a “little bit different, for me”! They certainly wont be extravagant, or bold, and will definitely involve my roots of patchwork and stitching! I use the word “stitching” rather than quilting, as I will only use two layers, rather than three, in whatever I choose to make. I used to make all my own clothes, but those days are long gone! I am rusty, but nevertheless, interested.

Several years ago I made a scarf (shown to the left), and I need to do something very simple again, to start with, while other ideas begin to develop. I love the vibrancy and interest in this scarf, which is a one off, of course. That is half of the enjoyment of wearing it!

I am going to make myself another scarf; machine pieced and hand “quilted”. There will be no wadding just a front and a reverse side, but it will be hand stitched through both layers. As you know I love hand dyeing threads and fabrics, and hand stitching, so I shall be combining both within the item. I also really want to enjoy the process so shan’t be in a hurry.

I have been gathering ideas, and a small collection of vintage fabrics, over the last year or so, some of which had already been embellished, with embroidery and lace. I also have some old lace that I may well dye, too.                       

It is always exciting starting on a new venture, especially if I am actually making something for me, for a change! This scarf will be blue, narrower and longer than the red one. (Just writing down my thoughts has given me another!! I shall have to make a bag, to go with the scarf! It will have to be recycled Denim, as I have a good stash to work from!) Scarf first, though!

I intend it to be just two layers again, as that is more drapable, and I shall use my dyed threads, and stitch through both layers! The red scarf was a great success, and spoken about often. At the moment I have not decided how I might embellish with stitch, but that will become clearer to me when the piecing has been finished!

I shall of course, also have small hand stitched work on the go at all times because I just cannot sit without having a needle and thread in my hands. This will be for small accessories, or cards! There is something so soothing, meditative, and gentle going on with hand stitching. It is easy, portable and for me, very enjoyable. My head clears of any irritating distractions and my thoughts roam freely around creating fresh ideas”! It is the doing that inspires the thoughts.

Until next time, keep away from those bugs, and Happy Stitching!

Di

December 2023 /2

Christmas Festivities are happening up and down the country! Hustle and bustle greets us all in the shops. The unseasonably warm weather is helpful with heating costs and thankfully for some areas of the country the rain has held off for a few days, but it seems that most people will be experiencing wet weather again sometime during the next week or so.

However the positive that we can take away at this time is that today (21 December) is the shortest day, and daylight will very gradually begin to stretch out. In the garden there are definite signs of Spring. Shrubs and bushes are budding, daffodils are in flower, in parts of Cornwall, and some Camellias have actually finished flowering!

I finished quilting the scrap quilt, a week ago. I used a cotton Request wadding, and had to piece the backing fabric. I pieced strips of fabric into a panel the length of the quilt. At the time, I had not realised how useful the strips of fabric would be in helping to keep my marked lines at an accurate angle!

Eventually I got to the machine quilting stage. I cleaned my machine and put a new size 90universal needle in for the quilting and used one of the neutral Aurifil threads. I had made the decision to quilt from the reverse side of the quilt, as I felt I could be distracted working from the pieced side. I used a Hera marker against my 24″ omni ruler, and a 6″ square Omnigrid ruler, to check the 45 degree angle of every line. It was much easier to slide that up and down the long ruler, once the long ruler was in position. 

I just marked 2 or 3 lines at a time, and alternated the direction I was quilting, i.e.top to bottom of the first line, then bottom to top of the second. All these little actions help the quilt to keep its shape. (Many readers, if not most, are very familiar with these points but I have included the details for readers who are new to quilting. Hopefully the photo alongside illustrates the details on this small section of the back of the quilt.

Finally I measured the width of the quilt across the centre, and wrote the measurement down, checked it again, then cut two binding strips to that length. I folded one of the short ends in half, and marked the centre on the edge; then pinned the binding to the quilt, right sides together. Measurements are really important to ensure the quilt hangs well. If the actual widths of the quilt at the top and bottom are slightly different to the original width across the centre of the quilt, they should be eased into the cut length of binding. The same process is followed for the long sides. i.e. measure down the length of the centre of the quilt first…. then follow the process once again, but this time added 1 and 1/2″” to the measurement. This meant that I had 3/4″ at each end of the binding to wrap around the cut edge, to cover the raw side. If this is a tad too much it can always be trimmed!

This quilt has not been made to hang, or to be exhibited, it is a bed quilt, so “hanging well”, as I discussed, is not the issue, but my mantra has always been “if a job is worth doing, it is worth doing well”.

Thank you very much for all your support during this last year. It really is very much appreciated.

A big thank you too, for all the messages and Christmas cards that have winged my way over the last two weeks. It is so rewarding for me to hear from you all.

I wish you a Very Merry Christmas. If you enlarge the card, you will be able to see the gold stitched embellishments as well as the beads!

Until next time, happy stitching!

Di

December 2023/1

Good day to you all. December came in with some bitterly cold weather. Our outdoor temperature in Mevagissey was -4 last Saturday morning (2nd December) at 7am! Quite a shock for us in Cornwall!! Thankfully it has risen since then, which makes travelling, and indeed walking, safer.

To the right is a “follow on” from my Abstract Daisies. These printed and water colour painted and stitched “circles” are fun to do. They are my evening projects at the moment! I have made a few Christmas cards, in a similar vein, but they are clearly different. Quite abstract in nature, but a recognisable image nevertheless.

My focus in the last few days has been to complete my granddaughter’s quilt top. I had four borders to sew on: a dark blue batik, then an indigo dyed border, then I wanted to piece a very narrow border to be sandwiched by another indigo border! The finished size of the pieced border is 3/4″. It has taken me hours, because I didn’t just want a repeat series of pieces of fabric I had used in the quilt. I actually wanted far more interest than that, so I have pieced tiny log cabin units, narrow stripped units, squares etc. in the same way that I have worked in the body of the quilt. I have inserted un-pieced fabrics as well, of course, but they are spaced out purposely! The size is 44″ x 62″. I love it, and hope it goes with her, what ever she chooses to do in the future.

The whole quilt is machine pieced, apart from the three flower blocks which were hand appliqued. Sophie is just 4 years old, and has no idea I have been making this, so naturally I hope she likes it, There is a lot for her to see, and discover every time she looks at it. I am going to machine quilt a simple crosshatch, diamond pattern over it, from the back, and hope to complete that to be able to give it to her for Christmas. Having looked at my backing fabric this morning, I need to make it wider, so I am having to create a long piece of patchwork. I hasten to add that it will be nothing like the size of pieces in the body of the quilt! Change of scale is good, and the pieces on the back will be large, out of necessity in my time available for sandwiching and quilting!

I am really excited to have booked two more workshops at the Oxford Arts and Crafts summer School running in August 2024. https://oxfordshireartandcraft.co.uk/ If you click on the link, you will find all the information about the courses, course content, tutors, dates, costs involved, and how to book.

Last year, you may remember that I attended Polly Woolstone’s “Building Up The Surface” workshop. It was a collage workshop. I was thrilled with how much I learned, and have made more collage books taking them further in my own way. They are my personal “sketchbooks” and in one of them particularly I have added a lot of stitch, and can add more, if I wish to at any time! I have ideas for more, with variations, and further ideas. Lots to think about!

This time I have booked two classes at the end of the week. The first is a calligraphy class on the Friday. I have long wished to have a go at calligraphy, and have actively been looking for a class for a long time. I have no idea if I would be any good at it at all, so a day workshop with an experienced teacher, will be a perfect opportunity to test me! The second class, the following day, is by Amanda Hislop, called ” Sketchbook Development: Observations and Experimentation”. I feel that this will be quite challenging, and I am hugely looking forward to it. What do we gain by standing still? Challenges are good, whether they be deadlines or anything else. Learning something new is supposed to be an excellent health challenge especially for brain health, and even more especially when we are in our older years.

So I am also challenging myself with a fresh printing block which I have made from a recycled waste product which a good friend, Sarah, gave to me, wondering if if it would be any good for printing blocks!

I used acrylic paint to print onto white cotton in this sample above. I have started to stitch into it, and already my mind is thinking of ways I can make this more interesting! So watch this space!! I l-ove hand stitching, and quilting so that will definitely be the way I embellish the blocks, but more ideas are starting to develop, and as I stitch, I know even more will come into my mind. I have a simple little folded sketch book I have made, so I can jot down the ideas as they flit in and out of my thoughts! However, my main focus must now be on sandwiching and quilting this quilt.

In case this is the last newsletter before Christmas, I wish you all a very happy, festive time, and I am sure that we all wish for Peace, world wide, for the coming year.

Until next time, Happy Stitching!

Di

November 2023/1

What a wild ending to October, and an equally wild introduction to November. Where ever we live in the country, at some time many of us have possibly experienced the destructive damage that can be caused by the weather! Very sadly, we are told to expect more extreme weather “experiences” in the future too.

Luckily, here in Mevagissey, we missed the atrocious storm damage that many people suffered with the latest Ciaran storm. Our hearts go out to all those homes, and people who have suffered because of the storm.

Recently I have immersed myself in experimenting with a very simple printing block, and watercolour. I have only used acrylic paints with eraser printing blocks in the past, and decided to try a different approach.

This photo pretty much shows it all! At the bottom right there is part of a strip of cartridge paper that I had printed with watercolour on the block, over a background wash of watercolour! The background wash was still wet/damp, so the printed blocks, which was also wet, resulted in a “bit of a mess”, to be honest. It was not at all clear, and I was not sure if I liked it!

I constantly evaluate what is happening in my work as I go along, striving to make the best of any effort I have put in. Lets face it, virtually every stage of any art work can make any of us sigh and wonder if it is worth continuing! After all this was an experiment, I had no pre-formed idea of how it might turn out, or indeed what processes I was going to try, so I had nothing to lose! So I cut the strip into sections, which you can see in the rest of the photo above, and decided to use a fine line black drawing pen to emphasise areas of the printed sections. A big improvement! They became clearer, and instantly I decided to use a very fine paint brush and use bright colours to infill the drawn “petals”. Now it was looking a very different kettle of fish! The bright paint had given life to the little section!

I was smiling now, which for me, is always a positive sign. When I placed a couple of dyed threads on the table, I really liked the addition, so using a glue stick I dabbed glue spots in the corners and on the centre, on the reverse side of the painted card and pressed a piece of Vilene in place over the glue spots, smoothing it out, before stitching a daisy stitch around the printed “petals”.

What a transformation! I love adding stitch to whatever I am doing, and I love using my dyed threads too.

These two close up photos show clearly that the the stitch sits on top of the card, giving an additional “layer” to the little pieces.

I feel now that they are tactile, bright, and delicious! It was well worth working at them, and pushing the early results on. I have a little project now for dark days, and evening sewing; portable and enjoyable.

About a year ago my friend Janine Ibbini, who lives in Abu Dhabi, was invited to become a member of a textile group called “Cloth in Common” https://clothincommon.com/

This is a small group of international artists who work with fiber. Their quilts are based on a one-word prompt submitted once every two months by a member. They have two months to complete the quilt. Each round (12 prompts) lasts for two years. They share their thoughts and art on this site. I have been following the site, and am fascinated by the diverse results submitted by the members each time. The latest submission prompt was Transformation.

Janine named her quilt “Abscission”, https://clothincommon.com/abscission/ and introduced her quilt by explaining:

“The trees in Yorkshire were beginning to shed leaves as we left back to UAE in mid- September. The dropping of leaves by deciduous trees is called Abscission. It occurs on the cusp of autumn and winter as part of a long cycle of growth, maturity and renewal.

Personally I had never heard that term before, and I read her explanation about the processes involved in the designing, planning and execution of her quilt, fascinating. What a very apt quilt for Autumn, too. It is stunning.

This is a short Stitching News on this occasion, but before I sign off I would like to remind you of Textiles+ exhibition, “Entangled Threads”.

I have been a member of Textiles+ for several years. Since our last exhibition in 2021, we have welcomed a few new members and they bring exciting skills in ceramics, weaving, patchwork and embroidery. We are all really looking forward to exhibiting our work together.

Members of the group will be present, stewarding every day. Textiles Plus’ biennial exhibition of work will be held at The Poly, Spring Gallery, 24 Church Street, Falmouth, TR11 3EG on Tuesday November  7th to Saturday November 11th, from 10-5 each day.  I shall be stewarding on Tuesday and Saturday. Entrance is free, and there will be a wide and varied selection of work to view, much of which will be for sale.

Happy stitching until next time!

Di

September 2023/2

The speed with which this month is racing through is quite astonishing!

It sounds as though we are going to have rather a bumpy, lumpy few days while storm Agnes passes through. There may we be some very rough, dangerous seas, around the coast. I sincerely hope everyone stays safe and dry. Sewing and “playing” days are such a blessing at times like these!

I added more stitch into my “Garden Collage book” for several hours each day last week or so. I am pleased with the progress I have made, and I am almost ready to create the front and back covers now. The two sections I have shown, give a flavour of the work, and enlarging the pictures on your device, will show more detail.

I had no set ideas about which stitches to use, or how to use them, until I got more adventurous! Then ideas started to flow. I just needed to start!

Ideas rarely just pop into my head, but with a bit of a nudge, (i.e. starting to stitch, and thereby making marks on the page, my mind opens up, and progress inevitably develops. I have been in no hurry, and that helps considerably as I don’t feel under any pressure. I am doing this purely for myself!

However after several hours of stitching, periodically over several days, I had developed a seriously painful and swollen first joint on the index finger of my right hand. It is “hard graft”, pushing and pulling the thread through several thin layers of collage papers, at times. That particular joint has been showing arthritic tendencies for several years now, and I clearly over did it! I have tended to ignore the increasing signs and just battle on! A serious rest and some TLC this last weekend has helped its recovery, but I have decided enough is enough now! Enough of stitching into this particular collage book. So I must make the covers and put it to rest!

By way of a complete change, I have been dabbling with watercolours on cartridge paper. I always like to have some little cards, postcards, gift tags, book marks etc available for any occasion and decided it would be nice to try some fresh ideas out. These cards are probably a little too big for gift tags, (3″ x 2″) but could be mounted onto a card, for small notelets. Being able to rummage in a box for a handmade “thank you“, and/or a “thinking of you” card to give to friends and family, is such pleasure.. These are plain on the back and do not have a fold. So are meant for a simple message on the reverse side.

I also made some recycled small bags from glossy magazine pages from an old edition of “Landscape”. As I was typing that last sentence I did wonder if glossy pages contain any plastic. So I did the inevitable and queried this thought with Google, to be informed that: “a small portion of magazines get their shine from a type of plastic called polyethylene (PE), which is not recyclable. You can easily decipher whether your glossy paper has been coated in natural additives or plastic by trying to tear it. If it rips easily, it’s naturally coated and, thus, recyclable.

The two paper bags that I made from the page are just little “pocket bags”! Nothing fancy at all, and only meant for small, lightweight items. I gave a dear friend the group of small cards, in a little pocket bag and she was thrilled with the concept of the “packaging”, as well as the little cards; so much so that we spent an hour making several of the little paper bags, of varying sizes, and in a wide variety of bright colours! Method explained below. It couldn’t be simpler, and once you have made one, you will be able to make any size you would like. They are perfect for a pair of earrings; a packet of garden seeds, or perhaps for a selection of fruit or herb teas.

Firstly cut a chosen page in half, across its width, putting one of them aside for another bag! Folding down the long top edge, and gluing it in place will give a firmer edge, and it would even be firm enough to punch two holes through to thread a little carrying “handle”.

Secondly turn the page over so that the back of the page is uppermost on the table, and in landscape orientation.

Thirdly cut a strip of double sided tape and place it edge to edge with the bottom raw edge edge of the paper, and then turn that edge up and fold it just the same width as the tape, to give a neat bottom edge.

Fourthly turn the page a quarter turn, clockwise, and repeat the same action on the top short edge, as in the third stage above, still having the “wrong side” of the page uppermost, but DO NOT fold the edge over at this stage. Just leave the sticky surface open.

Fifthly, bring the bottom short edge over to the opposite side, so that the raw edge is just touching the nearest edge of the sticky tape. The right side of the page will now be showing. Gently crease the fold at this stage. This is necessary so that placement of the last strip of tape, will completely seal the bottom edge!

Finally, open out the gentle fold again so that the paper lies flat, wrong side of the glossy page will be uppermost; and short edge with the sticky tape evident. Place a strip of tape on top of the folded bottom edge, starting from the gentle folded crease mark until you reach the sticky tape. This will just be on approximately half of the total bottom edge. Fold the bag from the “gentle crease”, so that the raw, short edge is in line with the inner edge of the sticky tape. Check that the bottom folded edges of the bag match evenly. When you can see that everything is in the correct position, press the bottom edges of the bag together to seal it, and only then fold the remaining double sided tape over the short raw edge of the paper, and you have completed the paper pocket bag!  

Last weekend, we were able to call into the ” “Stitch Together” Exhibition in Wadebridge. It was fabulous. A very wide range of embroidery techniques, along with patchwork, quilting, hand made books, to mention just a few disciplines within the exhibition at the John Betjeman Centre. The show of talent and range of ideas from some amazingly skilled ladies was truly inspirational. I was thrilled to meet and catch up with some lovely old friends, and to chat to some new makers, too. I came away buzzing! Thank you SO much to the “Stitch Together” ladies for making Rob and I so welcome.

I bought an old fish kettle on our recent visit to north Devon when we stayed with a long term friend. I have been on the look-out for such an item for a few years, to use in my Eco dyeing. So, today I had a little play, and was quite please with the results!

In the photograph on the right, the printed papers measure 8″ x 4.5″, and the prints are from Rose of Sharon and Buddleia . I Love the rich golden colour of the leaves, intermingled now and again with a deep cinnamon and even lemon yellow; all within the same print of the the Rose of Sharon.

At the right hand edge of these two prints, the spray of Buddleia leaves, is looking unusually delicate here. The green and gold, look good together!

The photograph on the left, shows the Buddleia print again, looking even more delicate! Probably because of the very different companions within the grouping!

The Cotinus leaves, print very differently at different times of the year, but rarely fail to give lovely results.

Other plants I printed with this batch included a male fern, which wasn’t very successful, partly because it shifted position during the layering up process, and wild geranium leaves.

I like the fact that the long fish kettle means that I can do flat, wider prints than I can fit into my steamer.

Rob has cut me two pieces of wood, the same size as the papers. So I put one of these in the fish kettle, underneath the paper/leaf/paper “sandwiches”, and the other piece of wood was on top of the pile, with iron weights on top of it, increasing the pressure and helping to make good contacts between the leaves and the paper! and keeping the stack of papers completely flat. A real bonus!

Textiles Plus’s  biennial exhibition of work will be held at The Poly, Spring Gallery, 24 Church Street, Falmouth, TR11 3EG on Tuesday November  7th to Saturday November 11th. The exhibition is called Entangled threads. Entrance is free, and there will be a wide and varied selection of work to view, much of which will be for sale. I am on the rota for stewarding on the Tuesday and Saturday, so if you have an opportunity to pop in, it would be really lovely to see you.

Until next time, Happy stitching!

Di