Welcome to the March blog. It has been a while since I last wrote. I missed out February …the first month I haven’t written a newsletter for many years….but I am back again now!
It gladdens my heart to see and feel the sunnier weather we have had during this last week! The garden flowers are glorious. Ours is very much a spring garden and it makes me smile everytime I walk outside. In almost every nook and cranny, in every flower bed, under the hedge and in the paths, there are primroses. The pond is teeming with life, and the birds are announcing the herald of spring as they chase around, flirting with each other and collecting nesting materials! Lets hope that winter is indeed behind us!
This month I have been really focussing on my very big quilt, indeed it has been my main focus for several months now, so I thought I would go through the stages of the planning and execution of the quilt in this newsletter. It is a wedding present for my neice.
She lives in Canada and when she told us she was getting married, I asked if she would like a quilt as a wedding present, stressing that I would not be offended in anyway at all if she didn’t think they would use one.
When she said they would absolutely love to have a hand made quilt I explained how to measure the top of the mattress and the drop to the bottom of that top mattress, as this will be the finished quilt measurement. Beds over there are huge! Hence the final measurement of 105″ x 108″ It is the largest quilt I have ever made!
The palette requested was black, white and grey.
When we discussed the design possibilites she said to me: “I love traditional patchwork designs Di, so I will be delighted with whatever design you would like to choose”.
She is not a quilter, so I chose a design which would show off the huge diversity of fabrics I wanted to use. I was conscious that I needed to choose a design where the black fabrics would not dominate, but would make a “quiet statement”, integrating well with the white and grey!
Once I had the measurements of the mattress and the drop required, I could see that the border was going to be 15″ deep. That is a very wide border all around the quilt! I wanted it to reflect the fabrics and the design elements in the main body of the quilt as it was important to me that the whole quilt should blend as one design.
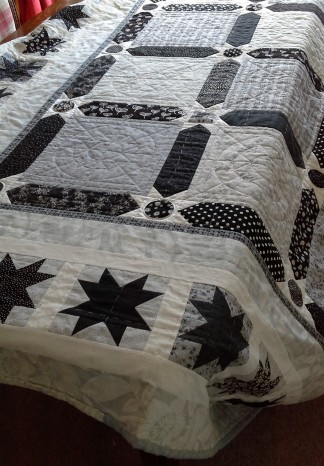
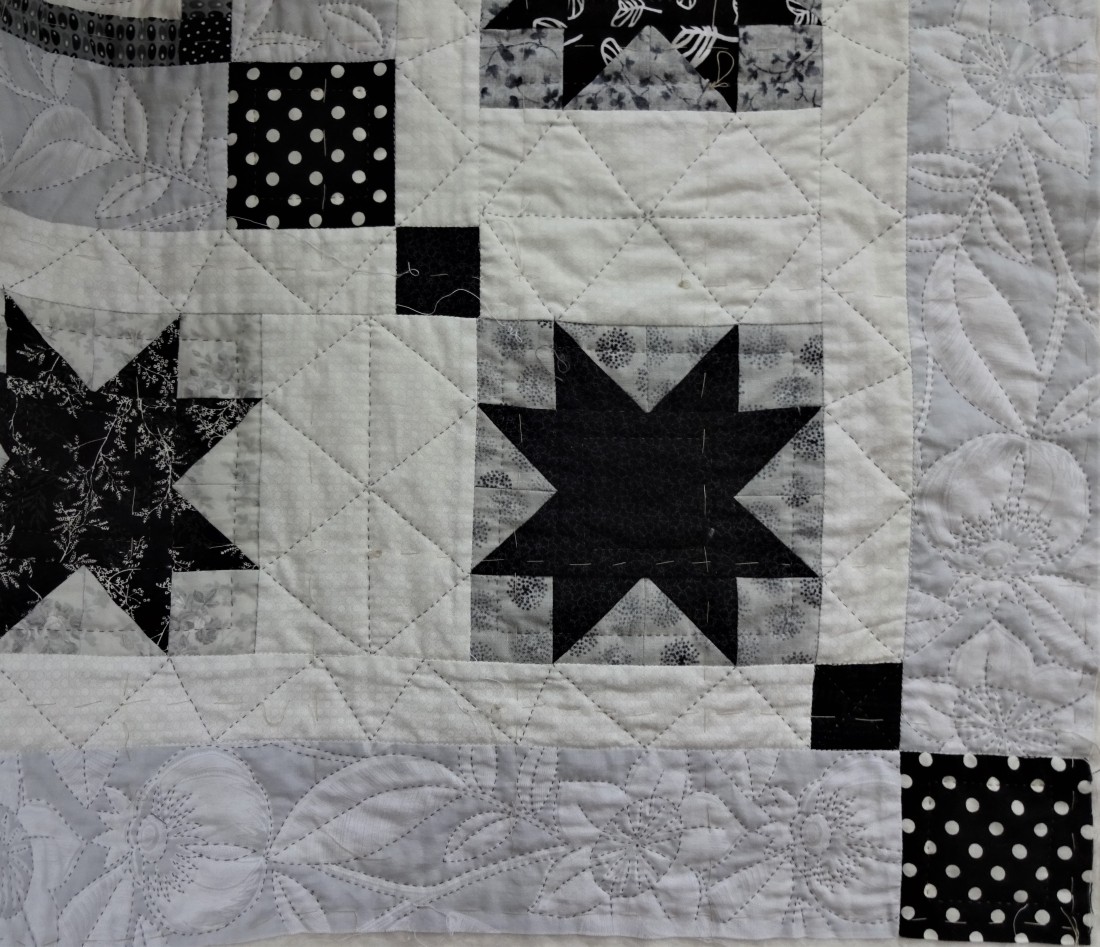
In order to just give you an overview of the quilt design I chose I have posted a photo above which shows a small section of the quilt laid onto my dining table. The top had been pieced, and hand quilted, but the quilting of the borders had yet to be started….but it shows you the main design of the quilt, before I go any further.
Ninety nine percent of the fabrics were bought from Jo at Cowslip Workshops in Launceston, Cornwall, and I added in two or three of my own hand dyed greys.https://www.cowslipworkshops.co.uk/fabrics
I actually started the quilt in 2014. No! I Haven;t been working on it that long! I will explain all, later on!
The inital planning was a challenge as it was essential to try to work out the quantities of fabric I needed to buy. Having been given the measurement of the mattress top I was able to work out the size of the main blocks (12″) and the width of the “sashing” (3″)and consequently the size of the “setting squares” (also 3″). The main design of the quilt would sit on top of the bed and all of this was worked out on imperial graph paper.
Next I planned the borders. Having a depth of 15″, there needed to be variety and interest in them and I chose more stars as the main feature. These would be in black framed by white fabric. At this stage it was also really important to plan the corners of the borders. They had to look interesting and an integrated part of the whole design!
I was now in a position to estimate fabric quantities. I made myself a comprehensive list and bought the fabrics in Cowslip January sale, that year. This helped considerably with costs! I added an extra metre here and there, a wise decision, as it turned out. All fabrics were washed and ironed before commencing!
The king sized beds in Canada are vast! I don’t want the quilt to fall to the floor, because of the safety issues. It is so easy to catch your foot and trip, especially at the corner of the bed where there is more fabric in the drape of a quilt.
I decided to begin with the setting squares, and counted the different white fabrics I had. Although this is a black, white and grey quilt, I have used many different fabrics within each of the colours. This is not immediately noticeable, particularly with the whites. However they do have different white on white patterns, and a variety of different weaves. Some have a sheen, others are matt, etc. and overall it does add so much more interest to the finished effect.
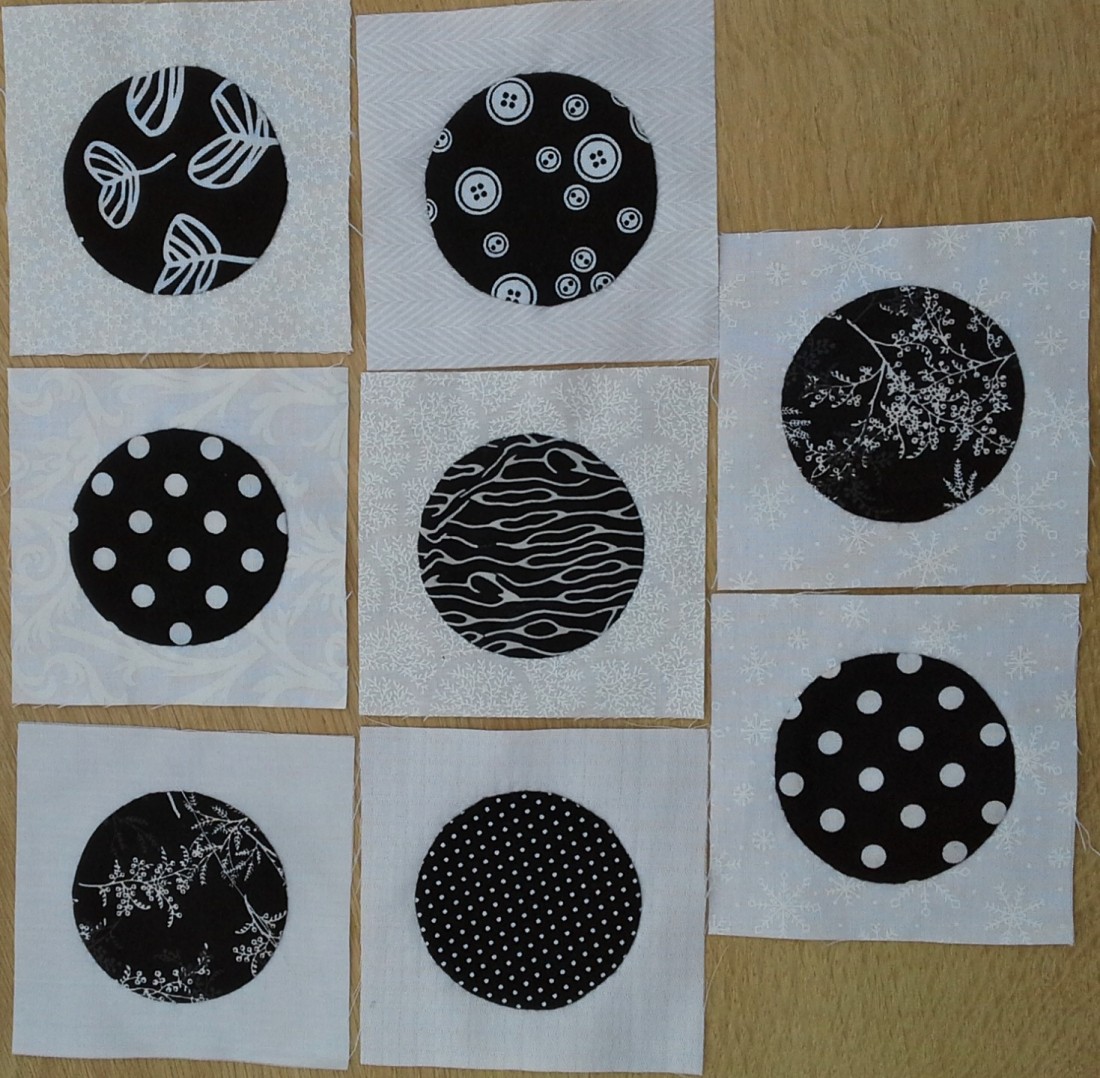
I cut the correct number of squares evenly distributed between the white stash. Then I repeated the process with the black circles, cutting them from a wide selection of the black fabrics.
To create perfect circles I made a 2.25″ diameter card template and drew around this on the reverse side of the fabric. The circle was cut out allowing a “generous 1/4” seam allowance outside the drawn line. I then made a running stitch in between the drawn line and the cut edge, starting with a knot, and leaving a tail.
This done, I positioned the fabric circle wrong side up on the table and placed the card template so that it matched the drawn line again, and I could then pull the ends of the thread so that the fabric circle pulled around the template hugging it tightly. The threads were then tied securely with a knot and I could press the “unit” as a whole with the iron on cotton setting. I had a perfect circle! To remove the card, I just carefully bent the whole unit, and could ease the card out of the back of the fabric. I made several templates, so I could work economically with my time.
Each circle was then appliqued onto a square, by hand, matching the fabric grain of the backing and the circle. The photo above shows a limited selection!
The stars for the border were my next focus. Again, I needed to work out how many stars I needed, and using my stash of mid–greys and blacks create an even distribution of fabrics again. A lot of work…but so much more interesting than just black and white!!
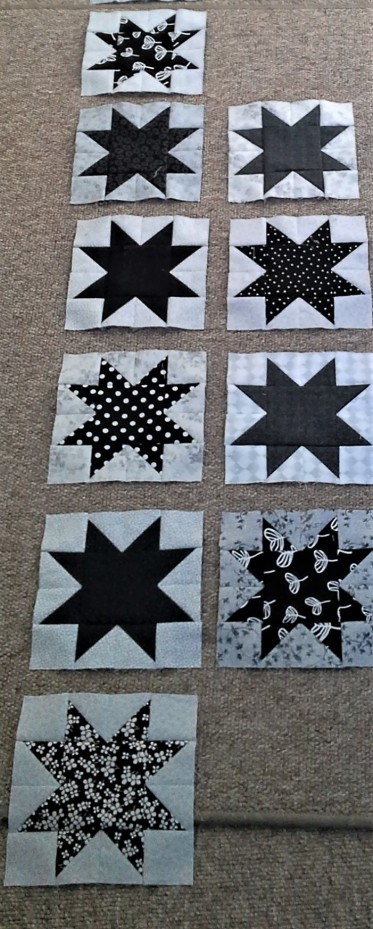
The most straight forward way to prepare these was in batches. If you look at the photo of the 8 pointed stars, to the left, you can see that they consist of a centre black square; four corner grey squares; 8 grey and 8 black “half square triangles”.
So I could cut these out in batches, putting each “star” in a separate pile, and I could then assemble them, one or two at a time, as I was able. They were all machine pieced.
I laid them all down on the floor in my sewing room and could keep an eye on the “mix and match sequences!
I chose to do the 8 pointed stars in the border, because at each of the corners of the main blocks in the body of the quilt, the way the sashing is constructed creates an 8 pointed white star, where four blocks meet. The “setting square” becomes the centre square of the star, as you can see below. It is also clear to see the white stars in situ in the very first photograph at the top of the newsletter.
It is probably appropriate here to explain how the stars were quilted after assembly, when quilting the borders, (then I shan’t forget to explain later on)! I quilted a 2″ square centrally within the middle of the square. Next I quilted in the ditch of the main 3″ square at the centre of the star. Then I marked out a third square 1/2″ in from the outer edge of the star block and finally the edge of the star block was quilted in the ditch. So each star has four quilted squares reducing in size from the middle.

Setting Squares sit at the corner of the main blocks. Sashing sits along each side of a main block. Above is a “one-off” setting square in this quilt. The reason for it is that I just had to have a “bit of me” in this quilt, so I chose to create a unique area of 5 tiny appliqued houses on one of the 3″ squares! This will sit at the left hand corner on top of the bed! All the other setting squares have white squares with the appliqued black circle.
At each end of the sashing unit, which is made from one of the black fabrics, there must be two white triangles. When four sashing strips with their white triangles meet, an 8 pointed star is created. I used many different white fabrics for the points of the stars.
This photo shows one of the main blocks with the stars at each corner.
When the whole of the quilt top, including borders, had been constructed, my husband helped me to centre the backing fabric, right side down, on our dining table. We marked the centre with a fold line. The 100% cotton “Request” wadding was then centred in the same way on top of the backing. The centre of the pieced top was obvious from its design and this was placed on the top. The weight of the fabrics hanging down over the table kept it all flat. I slid the “sandwich” across the table to pin the layers in place initially, working on 1/4 of the quilt at a time. When it was all pinned, I then tacked it all, constantly ensuring the layers were not rucked up, and working in 1/4’s again. I tacked it all in a square grid. Each tacking line was approximately one hand ‘s width apart. It took me three days!
Stabilising the quilt…
In order to do this, I used the walking foot to ensure an even feed of fabric. I machine quilted down each side of all the sashings, “quilting in the ditch”. I worked from the centre sashing on the top row of the quilt, and stitched straight down to the bottom sashing. Then, turning the whole quilt around 180 degrees, I machined from the “bottom to top”, in effect, on the opposite side of the same sashing with the next row of quilting, and continued in this manner working from the centre towards one side of the main body of the design. Quilting top-to bottom then “bottom-to top” in long rows, helps to keep the quilt flat, as it evens out any possible tight tension.
I then repeated this…i.e. top to bottom, bottom to top….across the other half of the quilt.
After that I made a quarter turn of the whole quilt, and repeated both processes once again…eventually creating a machine quilted grid across the main body of the quilt. I also had to machine quilt in the ditch of the six strips which made up the borders all the way around the quilt.
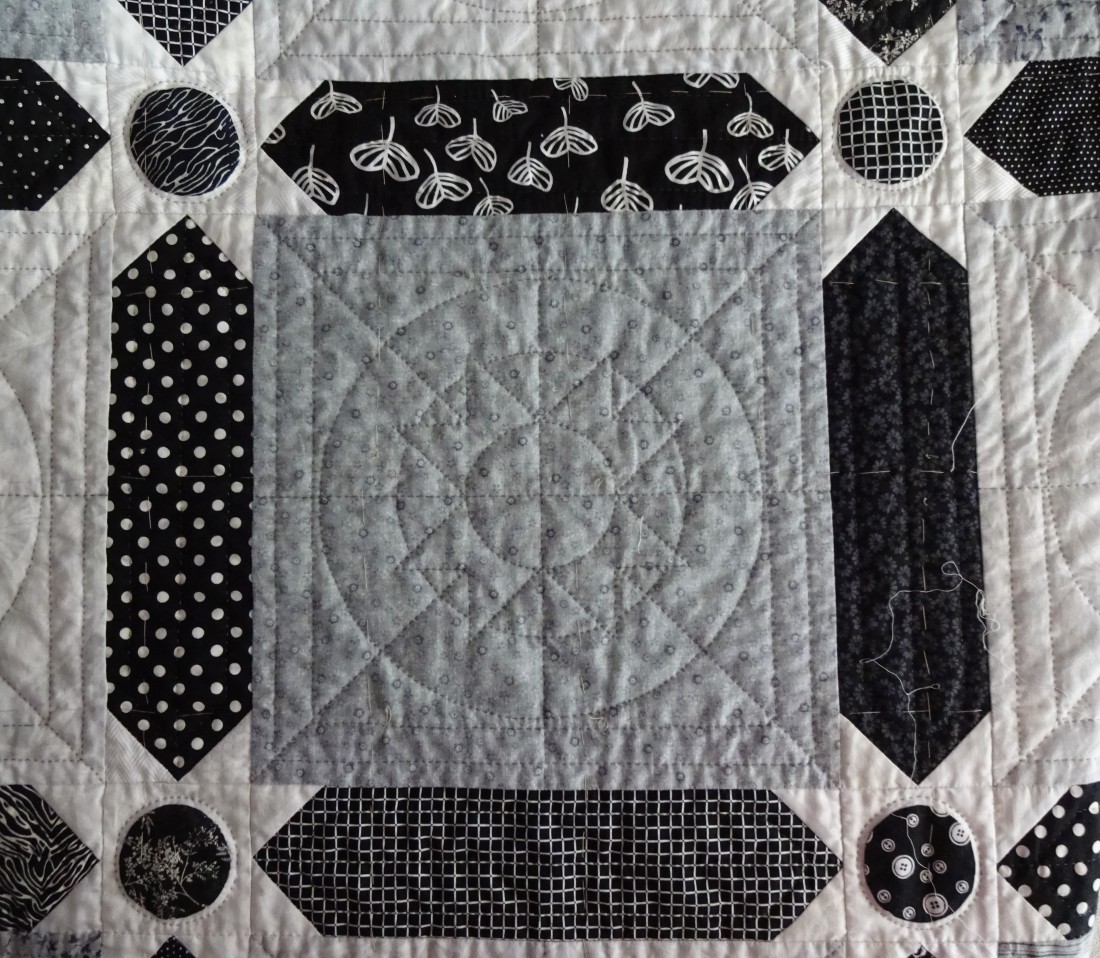
Hand Quilting. Once the stabilization was complete, I could start hand quilting the main 12″ blocks. The quilting design repeated elements within the piecing; circles, squares, and an 8 pointed star. This can be seen clearly in the last photograph.
Each piece of black sashing was quilted 1/4″ inside the perimeter with a central quilting line down the centre of the sashing. Each of the circles in the setting squares was quilted 1/8 of an inch away from its edge. …and it is impossible to see, but the white star was quilted in the ditch on the “outside of the star”. Again, most of these features are visiblein the photo above. I made card templates for the circles, and used a hera marker and omingrid ruler to measure and mark the long straight lines.
The photo above shows the arrangement of units at the four corners of the quilt. From the outer corner: A black 3″square, a 1.5″ black square, the 6″ black star square; another 1.5″ black square and finally on the inner corner of the border, another 3″ black square.
Wedding called off! Sadly the wedding was called off and the making of the quilt was put on hold. It was put away But now our niece is to get married, and would love the quilt to be finished, So I am working hard to do this, if possible by this August. She has stressed to me that she does not want me to feel pressured for the wedding date, as they will be delighted to collect it whenever it is convenient. I am not quite sure if I will make that date at the moment, but I am making a good effort.
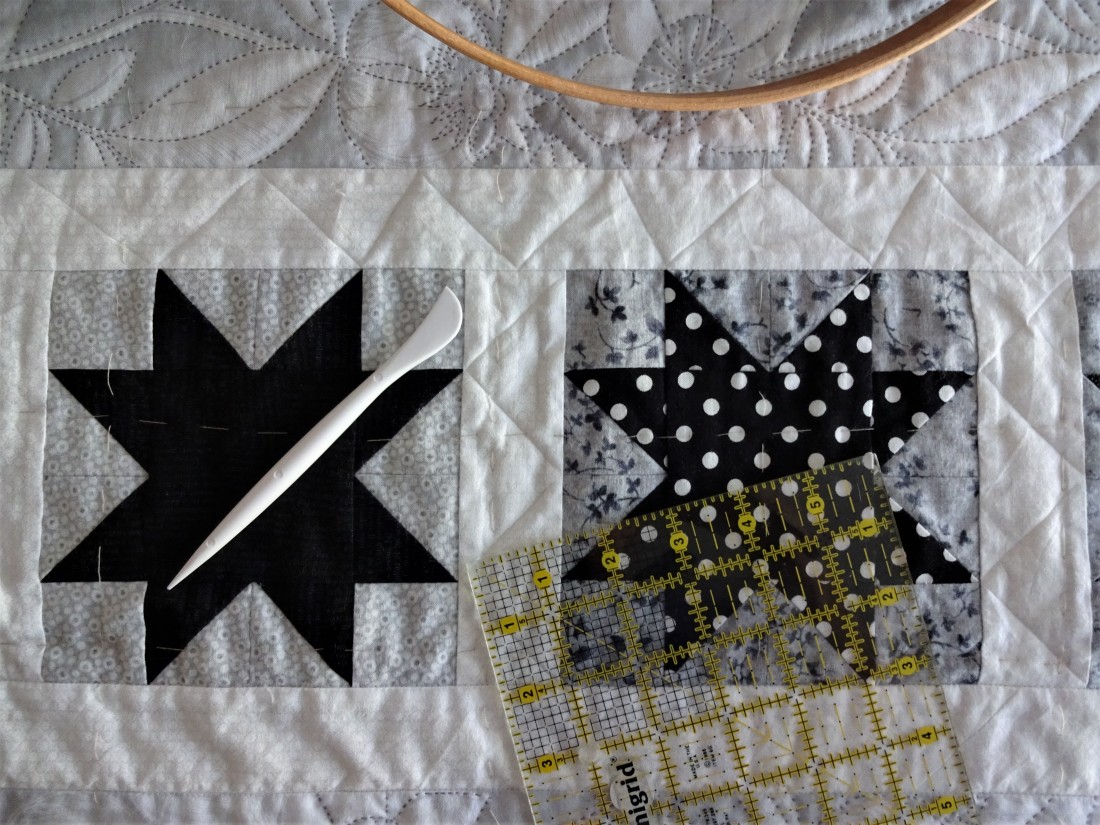
The photo above shows the hera marker, a piece of white plastic with a point at one end, and a curved edge at the other, lying on the black star. Using my 6″ Omni square I can run the hera marker along the edge of the ruler, pressing firmly onto the quilt sandwich. In this photo you can see where I have marked indentation lines ready for quilting along the top white border and also in between the stars. I haven’t yet marked the long white border at the bottom of the photo. Using the hera marker means that there are no smudgy pencil marks to get rid of. The indentation line disappears into the ditch of the quilting. This is one of my favourite methods of marking quilting lines.

Finally I would like to show you my favourite fabric in the whole quilt. It is the pale grey and white leaf and flower fabric above the long white strip, shown in this last quilt photo. It just begs to be outline quilted, as you can see where I have quilted the leaves and stems. …(the flower has more detail and looks delightful when finished). It is taking me a long time to do, because there are two very long strips (108″ long x 2) of this fabric within the borders along 3 sides of the quilt, and two strips 105″ long on the top of the quilt.
I am using a 14″ hoop for quilting the borders as it is so much easier to manouvre, than the 18″ hoop I used when quilting the main blocks. I have used a pewter coloured Empress Mills cotton thread for all the hand quilting. It is a lovely quality; soft, but strong.
The needles I have used for the hand quilting are size 11 Roxanne betweens. They are very small but have a good sized eye, and they are very strong; the best needles I have ever used for hand quilting. I bought them online, 50 needles in a little file. You can see how short they are as there is one threaded in the bottom white un-marked border.
The yellow handled needle nosed pliers are a boon. They cost about £1 in our local market “tools” department, When I have loaded the needle with between 3 and 5 stitches, I often need a little help pulling the tiny needle through all the layers. These spring based pliers are fantastic. I wouldn’t be without them!
This quilt is a real labour of love, and I can’t say that I shan’t be pleased when it is finished, but I am really delighted with it.
Happy stitching! Until next time….
Di

This is FANTASTIC!!
LikeLike
So pleased that you have enjoyed it Irene. I think you had a fabous week with Anne, and a very nice week afterwards.
LikeLike
Thanks Di. Was thinking about you the other day and hoping you were ok. It certainly is a labour of love but it is good to have a project. You will miss it when it is done. X Mary
LikeLike
Thank you Mary. Lovely to hear from you x
LikeLike
What a fabulous quilt! Very lucky niece! I love the square with your signature houses! Wonderful. Thanks for sharing the process.
LikeLike
Hi Rowena, Thank you so much for your lovely comment about the houses, as well as the thanks for sharing the process. You are very welcome.
LikeLike
Fascinating to read. Thankyou Di. Love the houses! Had to be there of course, wouldn’t be from you otherwise. Best wishes Barbara Curson
>
LikeLike
You are so kind Barbara. Thank you very much.
LikeLike
Hi Dithanks so much as always. What a labour of love – an absolutely exquisite quilt!! Your niece is very lucky indeed!! It’s very useful to see all the thought processes and the order of production. Really amazing!Do hope getting out into the lovely sunshine has made you feel a bit better.Lots of loveLindsay xx
LikeLike
Thank you very much indeed for your lovely comments Lindsay. Really look forward to seeing you next Thursday. Love Di x
LikeLike
Hi DiYour quilt is just so amazing, I can’t begin to imagine how many hours of work have gone into this. You have an incredibly lucky niece, I hope that she truly appreciates thevamoung of work and love that gave gone into this mammoths piece.I was in Cornwall with Anne Griffiths at the beginning of March and sorry to have missed you, however, we are already booked for next year!Kind regards and best wishes Lesley x Sent from Samsung tablet.
LikeLike
Hi Lesley, Many thanks for your really kind comments about the quilt. I am sorry I didn’t get up to see you all, but have not been well. Feeling more motivated now! See you next year! Love Di x
LikeLike
Absolutely loved reading about your quilt, the thought process is as interesting as the quilt is beautiful. And so pleased to see a post from you, I was keeping my fingers crossed that you were were recovering well after your previous newsletter.
LikeLike
Hi Jenny, it is a bit of a long haul, but am feeling more motivated now, thankfully. Thank you for you lovely comments about the quilt, and for your support Di x
LikeLike
My goodness what a labour of love Di its going to be wonderful. Thank you for sharing. So much detail it must have taken you hours to write it all, I know it would have if it had been me.
I really hope your niece is over the moon with it.
I to have been enjoying my garden, I spent half a day out there yesterday weeding, turning bits over and seeding with drift flowers to fill in gaps. I realise there is little space in the borders now and I have seedlings nearly ready to plant out. We have had so much sunshine recently its brought things on a treat.
Oh I have just noticed the time and I have a bus to catch to get me to the Junk Food project where I volunteer putting all the salvaged food we get from supermarkets into boxes for people to come and collect. Its good fun as I never know what we are going to get on the day.
Love Brenda. X
LikeLike
Lovely to hear from you Brenday. THank you for your enthusiasm, and support. Love Di
LikeLike
hello Di, it’s so nice to hear your news and to see this amazing new quilt you are working on – what a mammoth project, you are a brave woman! I like the design of your blog – I know its a cheeky question, but can you let me know what the name of the “theme” you have used is, as i am thinking about setting up a wordpress blog myself and can’t find a template that i like, love chris x x
LikeLike
Hi Chris, I will email you about the blog. Lovely to hear from you…Yes…”brave woman” is probably quite succinct”! Take care,
Di
LikeLike
Hi Di’
Many thanks for this latest newsletter and sharing with us this beautiful quilt Reading all you methods and instructions i can hear this labour of love and enthusiasm for your wonderful work Good luck with this project and I am sure you will succeed your deadline ! fondest regards Ann xx
LikeLike
You are so kind Ann. Thank you very much for your kindness, and for your lovely comments. Hope all is well with you. Di x
LikeLike
Greetings Di — was trying to find a way to contact you regarding “Denim Dolly” on the pinterest page. Do you allow people to make these dollies and sell them at craft fairs? I’d like to do this.
LikeLike