It has been lovely to have had such good weather recently, and a pleasure to have had glorious hot sun very recently. I could visualise everyone out in their gardens, saying “phew, ain’t it ‘ot…”!
What is there to read about in this newsletter? I have had a busy time over the last three weeks; lovely visitors; few days away; only a rather limited amount of sewing for the sales table in September, as well as the ordinary stuff that has to be done! Contrary to what some people imagine, I don’t sew all day! However I do try to do something with a needle most days! As I have always said: ” a few minutes here and there, do add up”, especially when the alternative is no sewing done because “there isn’t time”! So I have included:
- My favourite three sewing machine feet, and additional ways I use them
- Personalising a gift by making your own gift tag.
My sewing machine has to be my “can’t do without” sewing tool. I have a Bernina 1015, which I bought in 1987, 31 years ago. I use it virtually every day! It is a real workhorse; extraordinarily heavy, as it is all metal, but I love it, and wouldn’t change it for any other machine.
Having said that there are attributes which could be equated with other machines on the market, so some of the suggestions about how I use my machine could really work for others as well.
From its number, 1015, and its age, you can probably tell that it is a reasonably basic machine. It has about half a dozen decorative stitches, and the same number of basic functional stitches. Recently I went away for a few days, this was the view from the little cottage window that I was staying in….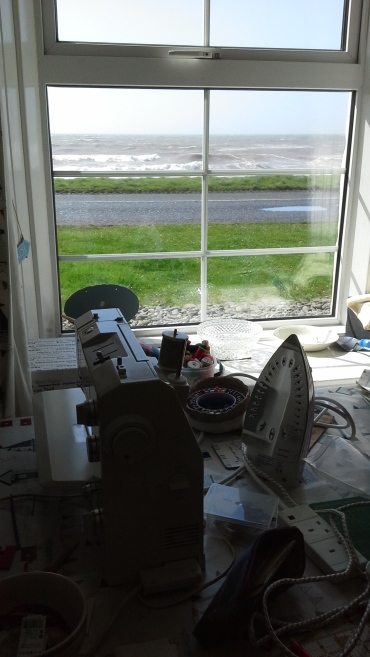
…and, YES, this is my sewing machine on the table! I apologise for the poor quality of the photograph, but it was very bright outside, and consequently, taking the photo from inside was never going to be good! The view is wonderful though, and does actually illustrate that I am away from home. Although we live in a Cornish village, our house is not by the sea.
I have always taken my sewing machine away with me, if it has been possible! I can then use it in those early morning hours, when no one else is up…etc. On this particular day it had rained steadily all morning, so I sewed very happily and then when the sun came out, we went out for a glorious long walk.
I recently had my machine serviced, and what a difference. It was in dire need, I have to say, but finding the “right time” to do without it is not easy! It sounds totally different and very quiet now, instead of the clanking noise it was making! I have always regularly cleaned it to remove fluff from the bobbin race, and from under the needle plate etc, but, of course when it is serviced the whole of the machine front is removed. Each part can then be cleaned and adjusted if necessary. It needed a lot of that!
I mostly only use three feet!
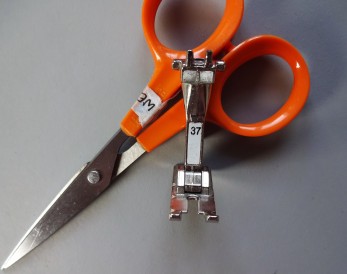
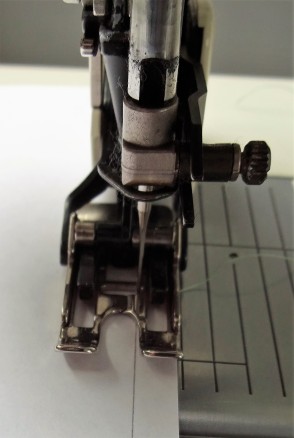
The 1/4″ foot; number 37. This is a really versatile foot. I use it for four techniques;
1. An accurate patchwork seam allowance
2. Topstitching
3. A very fine satin stitch
4. I also always use it, instead of a zipper foot, when inserting zips into pouches and bags. I wrote about this method in the February blog.
(N.B. All the blogs are listed and can be accessed by clicking on them under archives to the top right of the current blog. The function of the scissors in the photos is purely to support the foot.)
The 37 foot is sold as the 1/4″ seam allowance foot and I use it all the time for this purpose, when piecing. It also has a second purpose, which many people I talk to, aren’t aware of. You can see that inside each arm of the foot the width changes, half way along. This indicates that the measurement from where the change of width occurs, to the needle is exactly 1/4″. This is really useful if you are sewing along a seam towards a corner, and want to be able to pivot accurately at the corner and continue stitching along the adjacent side, maintaining the accurate seam allowance. As you approach the corner slow right down for the last few stitches. When the change of width on the foot is in line with the end of the fabric, you can pivot, with the needle down and start stitching again, confident that at the point of pivot, you will start sewing again with an accurate 1/4″ seam allowance. So, with this foot on the machine you can accurately sew with 1/4″ seam allowance and also accurately judge when you are 1/4″ away from the end of the seam.
For top stitching I often use the inside edge of the 37 foot, as my guide. 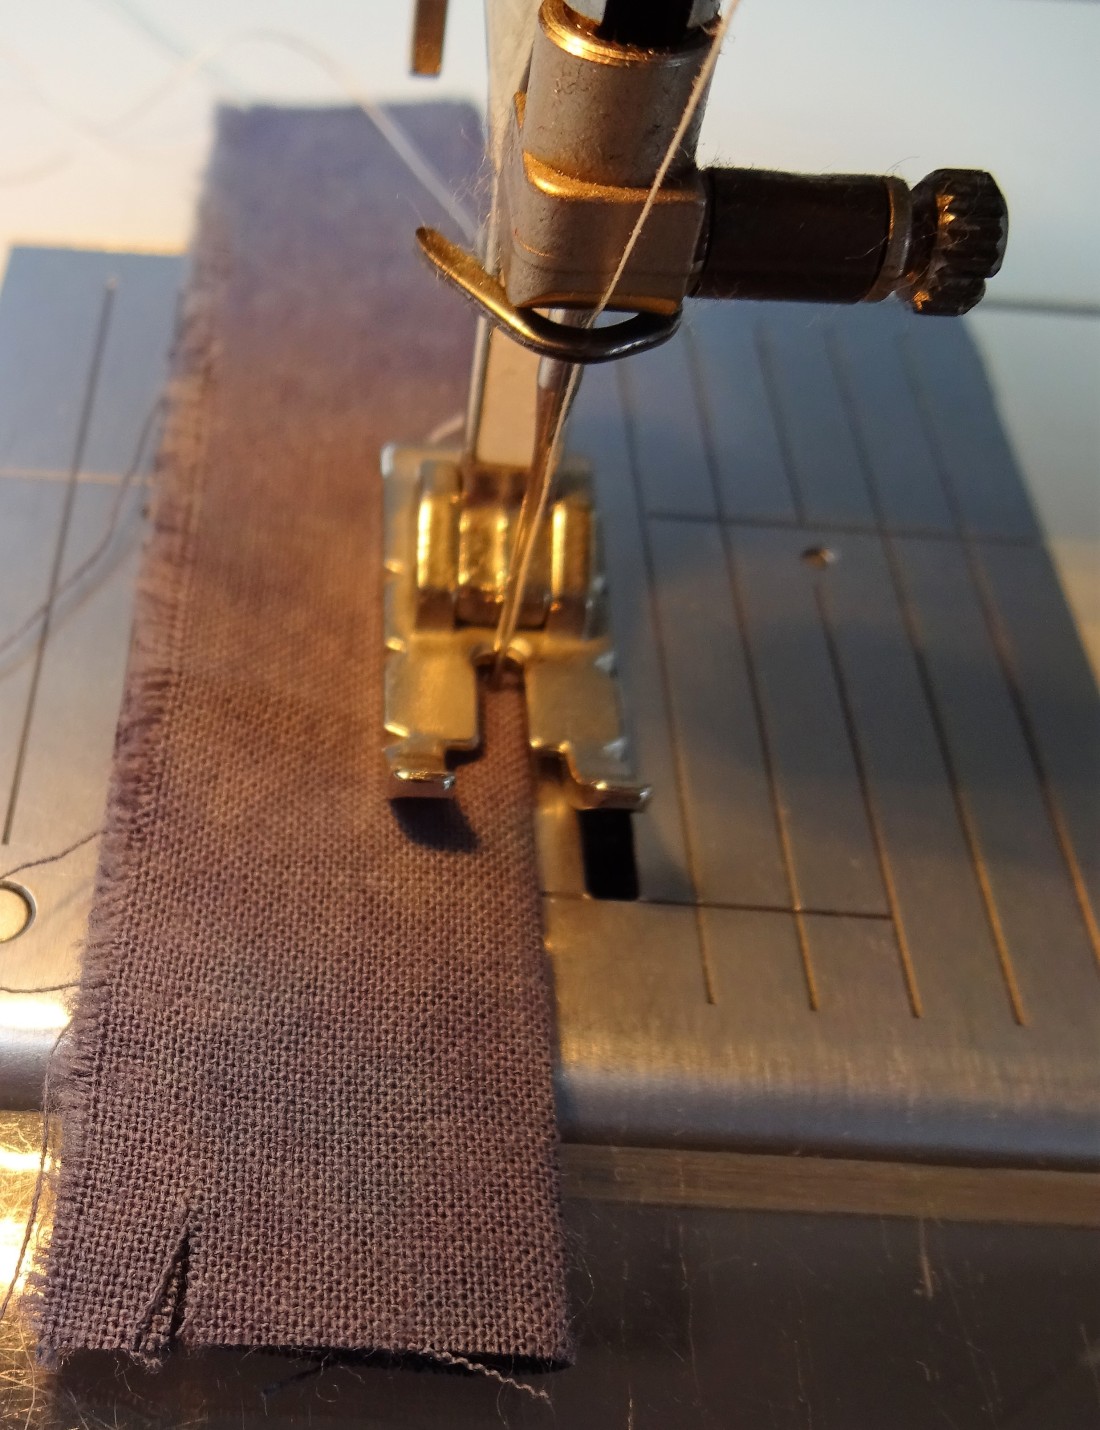 To do this, try it out on a sample first. Fold a scrap of fabric in half. Line up the inside edge of the foot so that it touches the fold. Insert the needle into the fabric, and stitch slowly, making sure that as you stitch you are checking that the inside of the the foot runs along the fold line.
I like using the 37 foot to satin stitch. It is imperative to do very careful sampling when estimating the width and length of the stitch. There is only a very narrow gap for the needle to swing from side to side, so I take my foot off the pedal and turn the flywheel by hand while making this adjustment. Then I can watch the position of the needle as I slowly, manually lower it against the inside edge of the foot. The wheel is turned really carefully so that, as the needle swings across the width of the gap, making the zigzag for the satin stitch, I can make any adjustment necessary to the width of the stitch, ensuring that the needle clears both arms of the foot. As soon as I am happy with the clearance, I can use the pedal and work at normal speed again.
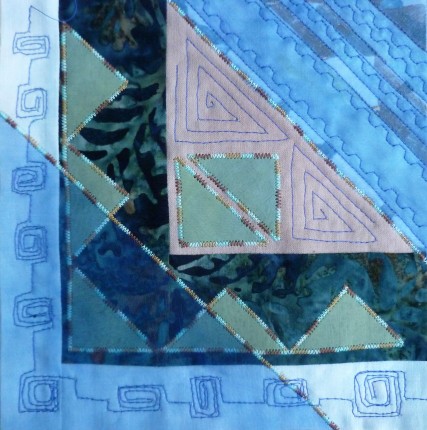
The small, neat satin stitch, worked with this foot, is a very useful technique which works well for me because I frequently work on a small scale! I use it either to cover the raw edge of applique, or purely for embellishment. Below is a reminder of how I had used this stitch in the “remake” of the block I showed in the December blog. The stitch is functional as well as decorative here.
The open-toed free machine embroidery foot, number 24, is my choice for free motion quilting, when the feed dog is lowered.
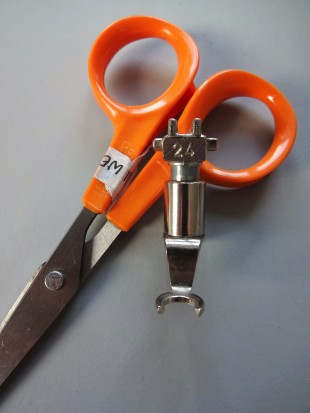 It has an open circle which means that I am able to see exactly where each stitch is made as the open ring gives clear visibility right up to the needle.
There is another foot which is used for exactly the same purpose. It is very similar but has a complete circle. That suits many people but is not for me!
I have also used this foot for free zigzag! I work out what width of stitch is suitable for the needle to swing from side to side, in the same way that I prepare for the satin stitch with the 37 foot, above.
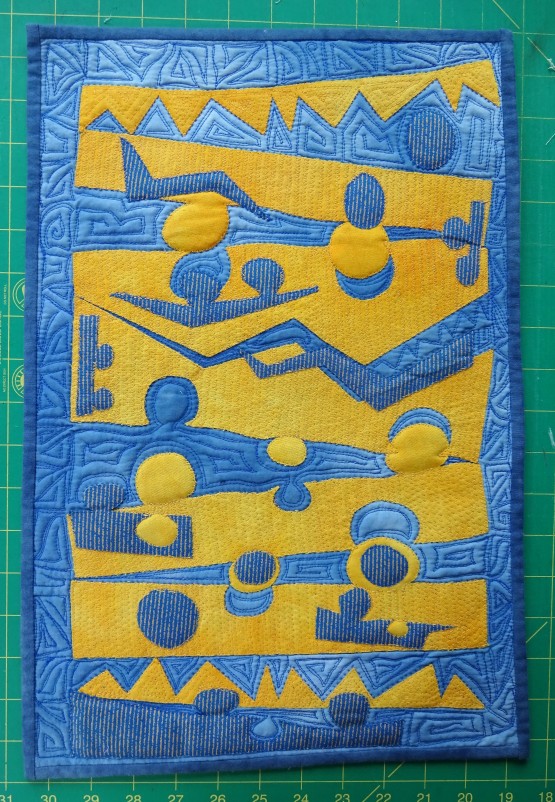
This photograph shows a very small contemporary hanging that I stitched many years ago, possible in the late nineties! I had visited an exhibition of work by a group, then called “The Six”, of which Bobby Britnell was a participating exhibitor. http://www.bobbybritnell.co.uk/about/exhibitions
I was really drawn to her work and particularly liked the textures that she had created. My impression was that she had used free motion zigzag over the surfaces of her hangings. I was keen to have a go. Because the feed dog is down you have the flexibility of increasing the the length of the stitch, by moving your fabric at different speeds. It is really interesting. Why not try a sample, just for fun!
you can see in the photograph that I have created a texture over the surface of my work, and equally, a different texture was created in the areas left unstitched. This added another design element to the end result. It is a contemporary little piece, and as such I deliberately chose not to make it square cornered
. You can see more detail if you are able to enlarge, using your touchpad; click on the photograph, then spread two fingers on the touchpad. You will have to scroll down slowly to find the photograph again, but the detail will show more clearly. Press ctrl+zero to return the screen to its normal size. The above, small (A4) sized hanging was my first attempt. I then followed this with another three small hangings still using the same free zig-zag stitch all over the surface. I learned how to stitch the zigzag row, then switch to a free straight stitch, to travel around the edge of the area I was working on, to get to the next area to be zigzag stitched. I used the open-toed, free machine embroidery foot, number 24 to quilt this entire little hanging.
My walking foot is in frequent use too.
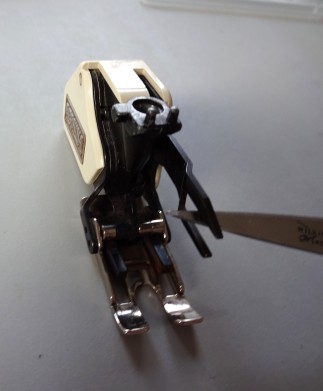 I have had this foot almost as long as the machine, and it is very straightforward to fit; something that I understand isn’t always quite as easy with the more modern Bernina machines and their walking feet.
When I put it on, I ensure that the needle is at its highest position. Then I turn the foot so that the side of it is facing me and slightly tilted towards the machine so that the peg on the machine can fit into the socket on the foot, whilst the arm with two small prongs is eased, simultaneously, onto the needle pin by the user.
(For the purposes of the photo I have used the end of my scissors to lift the arm so that the prongs are visible).
I use this foot for straight line quilting, and often for sewing bindings onto quilts too. I also use it if I am working with “difficult fabrics such as velvets, or slippery fabrics. The way it works is that there are two movable “feet” which sit on the top, towards the back of the walking foot. They move the top fabric through at exactly the same pace as the feed dog is moving the bottom layer of fabric through, thus eliminating any drag on either surface. All the surfaces end up exactly together at the end of the stitching. The foot is quite sensitive to lumps and bumps in the work they are stitching. So if the foot does not appear to be advancing, (this often happens when crossing a bulky seam) stop sewing with the needle down, lift the presser foot, and you will notice that the little feet move forward. put the presser foot lever down again and when you start stitching the top-feed feet will work perfectly again.
It is still possible to stitch with a 1/4″ seam allowance, using this big and rather bulky looking foot, if you are able to change the needle position on your machine. On my machine I can move the needle two positions to the right and two positions to the left of centre. I am aware that this function is not always available on all machines.
The 1/4″ needs to be worked out accurately, not just judged by eye! The easiest way is to place your quilting ruler a bare 1/4″ over the edge of a piece of plain paper. Draw a line on the paper with a razor sharp pencil, angling the pencil into the edge of the ruler.
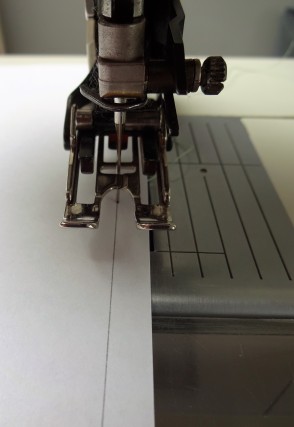 Place the paper under the machine and the machine needle onto the pencil line. Put the foot down, checking exactly where the edge of the foot is in comparison to the edge of the paper. If it isn’t in line, then try a different needle position.
In the photo to the right it is obvious that the needle needs to be moved to the right. Lift the needle out of the paper, and then alter its position on the machine, and try again.
 In this second photo you can easily see that the needle position has been moved across to the right, now indicating that an accurate 1/4″ seam allowance can be stitched, using this foot, now!
When I teach, I notice that often students use their “normal” machine foot, and assume that it is sewing with 1/4″ seam allowance. It is always a good idea to check, using the method above, to see if it does indeed stitch with 1/4″ seam allowance. After all, we cut out fabrics allowing for that, so we do need to be aware that we are sewing with the 1/4″ too!
Additional machine feet are very expensive to buy, so it is always worth having a look to see if you can use one of your existing feet for any additional purpose.
A final little sewing tip!
I have been stitching with PVC coated fabric over the last couple of weeks. Not easy, but I remembered reading that if you put tissue paper between the PVC surface and the needle plate, you can sew quite freely, without the PVC sticking to the metal! I gave it a go, and it works fantastically! The tissue paper perforates when the needle passes through it, and tears away easily. No more frustration!
Giving a gift. The simplest little addition to giving a gift, is a handmade gift tag. I like to have a supply on hand and have got quite low recently, so I have been recharging the supply. I like to use erasers for small printing blocks. They are so easy to cut into with a pointed craft knife. Inspiration is all around us; in our gardens, during a walk in the lanes or park. You really do not have to look far. If it isn’t easy to get outside, then books, and magazines have a wealth of imagery and ideas.
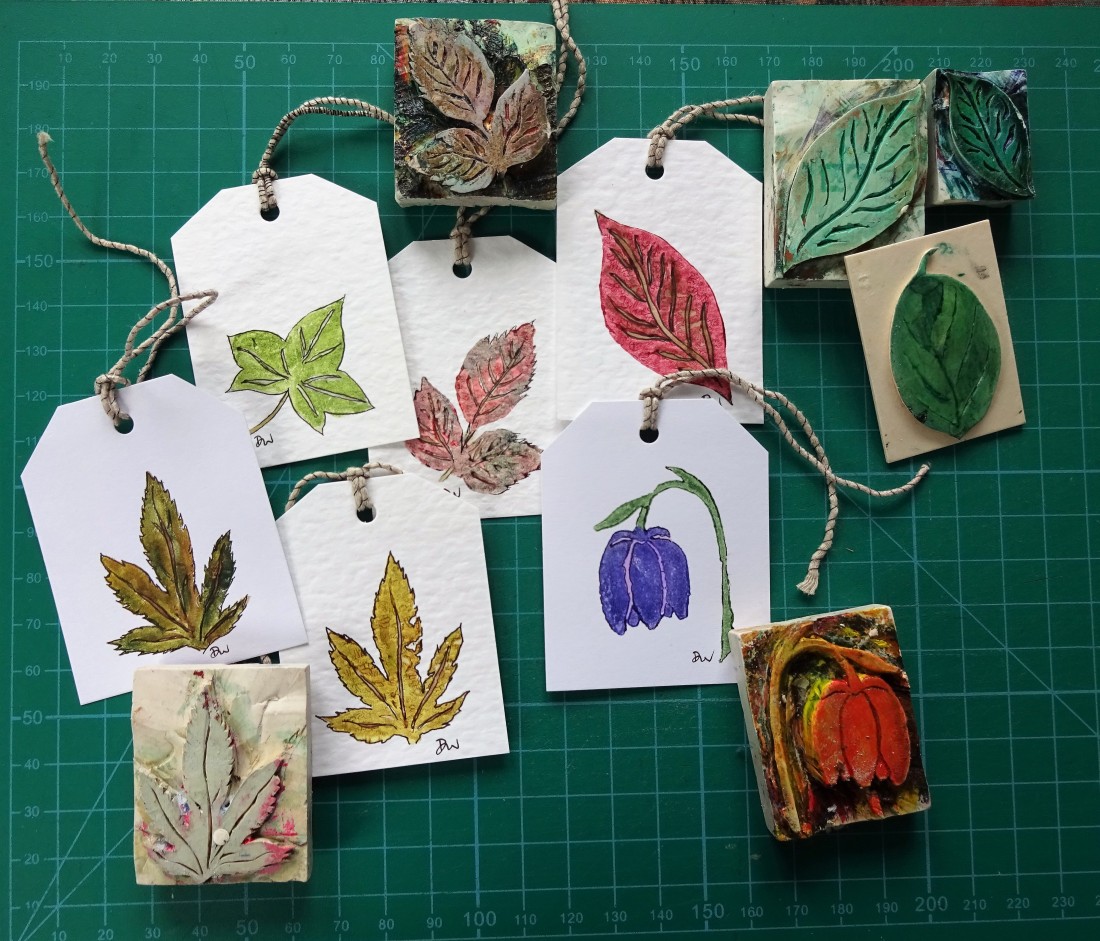
I have a shoe box full of printing blocks. Above you can see three or four with resulting gift tags. These are a selection of the few left, so I have cut some fresh card, and printed up a few more. I have used Koh in Nor paints, which are very vibrant. You can make them “calmer” by diluting them a little!
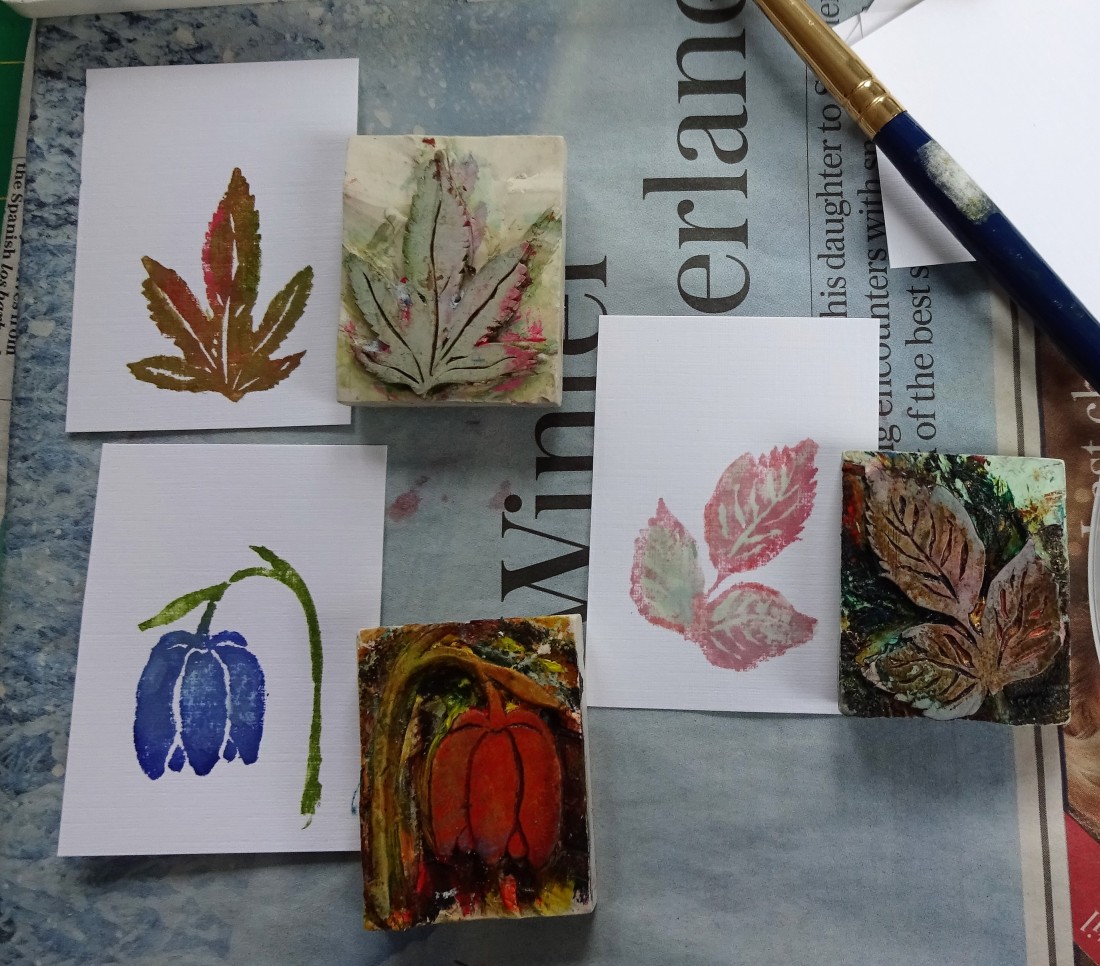
When they are completely dry I like to use a very fine drawing pen (0.1) to very lightly sketch out the outline, and add detail. This sharpens the image. Compare the printed images above freshly made with the addition of the fine ink pen in the photograph below!
You have to work fast when applying the colour to the block and then printing onto the card, especially if the block has two sections for different colours, as in the Fritillary, because it dries very quickly. If the block hasn’t given a terribly good result, use your brush to add more paint on top of the print, but do it very sympathetically! There should be enough colour still on the brush without having to reload it. Reloading will give a stronger element which you may not like. Mixed colours always add more interest.
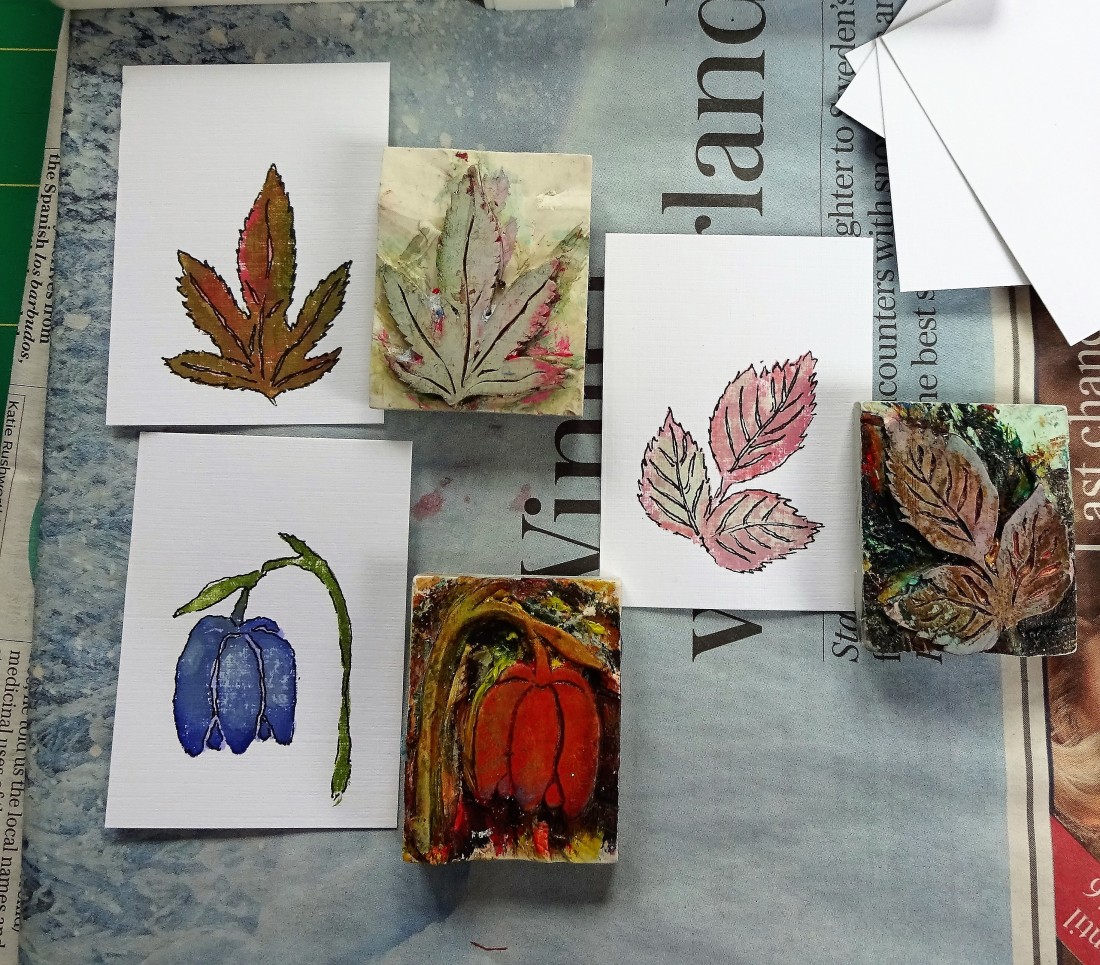
The blackberry leaves on the right, were certainly turned into a very usable tag, by the outlining. I wouldn’t have used it without!
 If you are making your own print, but don’t think you could manage anything too detailed, it can be very simple, e.g. you could print using the end of a cork!
The tag in the picture to the side, was simply made by using an ink pad to apply ink to the end of the cork, instead of paint. The surface was not very even, but a texture was created as well as the outline shape. I painted over the texture, turned them into balloon type kites, and have written the child’s name, Sam, on the balloons. It took precisely five minutes! It could be used as a bookmark after being used as a gift tag!
If you don’t have any blank card, think “recycle”.
Plain card is often used in packaging. It is also used for “order of service” occasions in churches; weddings, funerals etc. Any that are left are usually destroyed. I am sure that the vicar would be delighted if they were used and recycled in a creative and useful way. I know someone who does this, and her vicar is really helpful.
Ask friends and family if they have any plain card that they don’t want. It is surprising who has what!!! Unused card wallets, used for filing documents would make great labels. It is easiest to cut the card into the correct width strips first. Cut one strip to start with, and cut that into individual tags. you may want different width tags, so cut strips as they are required. If you want to shape the top of the tag, make a “template” from one of the tags by lightly folding it in half lengthways, then cutting off the top corners. Because the corners are cut off together, they will be symmetrical. Write “Master ” on this tag, then match the template to each cut tag, and draw a line against the template where the corners need to be cut off. The tags will then look neat and professional.
The gift tags in the first photo measure 2″ wide x 2.5″ at the longest length. The new printed tags I have made measure 1 and 7/8ths” wide x 2.5″ long.
If you use a favourite printing block (it may be a commercial one), then this might well determine the size of the tag.
Experiment, and see what works for you. At the end of the day, your own handmade gift tags will be hugely more appreciated, great fun to make, and infinitely less expensive than bought ones. I have friends and family who have saved every handmade gift tag they have ever received from me, which is really delightful.
Happy stitching!

Hello Di,
Whenever I read your newsletters I always feel so much calmer and content. You have such a lovely way of explaining things and I just wanted you to know that I very much look forward to reading them.
Sending my best wishes
Tracey x
________________________________
LikeLike
Thank you so much for your comment Tracey. I am delighted that you enjoy the newsletters so much.
LikeLike
Hi Di
I look forward to your news letter every month. Thank you so much.
Regards Alison x
LikeLike
Dear Alison. Thank you so much for your comment. I am delighted that you enjoy the newsletter so much. It really gladdens my heart to know that it is really appreciated .
LikeLike
Many thanks Di for another “newsletter’ which i like many of your followers look forward to receiving it each month. A little bird mentioned you will possibly be visiting Stroud exhibition on Thursday afternoon where hopefully i will catch up with you in person?
Kind regards
Ann White xx
LikeLike
I definitely am Ann. It will be so wonderful to see you there. Look forward to it.x
LikeLike
Many thanks for your reply and it was wonderful to meet up on Thursday in Stroud at the exhibition xxx
LikeLike